It's been long enough, so here we go! Let's look at the plates for rule two of the sword alone. I think that in general they're a lot more straightforward than those for rule one, which I also think is true of this rule overall. In rule one we had a flowchart which was somewhat complicated, at least until we got it all down on paper. Rule two really just concerns itself as to whether your opponent is on your inside or outside and what you should do in either case. Measure isn't explicitly mentioned, and even implicitly isn't as detailed as how it was covered in the first rule. It isn't as though measure doesn't matter, but it's not the primary principle being used here.
Almost as if each of these rules, while potentially standalone, are also examples of different areas of focus for the principles which will allow you to proceed towards your opponent with resolution. Super weird, right?
So let's get to it!
Like we saw previously, this plate is an example of our initial guard position. It removes the lower torso from measure and presents the head, as it keeps both the guard and forte of the sword as well as the empty hand by the face to protect it. As we can see, easily finding the sword is made difficult by keeping it initially quite high, and the squared-off body ensures that you can really only be attacked to the inside. All of this means that you can set up a fairly predictable set of actions from your opponent, which will in turn ensure a predictable decision tree for yourself.
Plate 118 illustrates the next step in this process. As Fabris has previously described, we've lowered our body while keeping the same position of our arm relative to our torso, which brings our sword down to meet our opponent's. This plate also shows one extremely key component of this position - the relative distances of each fencer's body to their swords, and how that impacts the dynamics of the fight. This is kind of a big deal, so let's take a short trip down this rabbit hole before we get back on track with what Fabris explicitly tells us here. (Which also touches on this as well, so it all works out!)
The relative positions of the blades themselves are pretty standard when you think about it. This is where Fabris wants us to get as a general rule - our hilt down by their debole, which is a great position to be. In the plate though, you can see that our head is about as close to our opponent as our hilt, which is in stark contrast to the relative positions of our opponent's hilt and head, where there's a full arm length of space between them. What does that do for us?
So first off, for what is probably the majority of fencers out there, measure is taken from the opponent's sword. There can be a whole lot of problems with that, but I don't think that I'm particularly off base here. What this means is that yeah, your body is probably a lot closer than a lot of people will expect; certainly, it's a lot closer than the relative blade positions will indicate. The upshot of this is that getting your body past the point of your opponent's sword will be a lot easier, especially with the fact that you're constantly moving forward. By the time they cavazione, your torso will have moved past their point, which dramatically reduces the danger that you're in.
In addition to that, remember that your blade is farther out to the side than usual. What this means is that if you've managed to approach to the outside as Fabris tells you to, you're going to force your opponent to take a larger cavazione to get to your inside line and threaten you, and an even larger one than that if they're going to find your blade as part of that motion. Essentially, you're forcing them into a larger and less efficient action if they want to move inside your blade, and you're for sure going to take advantage of that.
Anyway, back to what Fabris says! He notes that with this arm position, if your opponent performs a cavazione that "your body will be as far forward as your opponent's mid-blade." So that all tracks, and a subsequent plate will show us what happens there. Additionally, he notes that if your opponent tries to find your sword, you'll be situated to pass underneath their blade - which we're about to see!
Here we are at Plate 119, and here we are passing underneath our opponent's sword!
Fabris points out that if our opponent is in a higher guard when we move from the situation in the previous plate, this is more or less where we can end up. Note that we can make out our sword being on top of and controlling that of our opponent's. If they're in a lower guard, Fabris tells us to just lower ourselves to match, which we'll see by the end of this series of plates. Finally, he points out that if our opponent tries to parry and raise their sword, we can turn our hand into second and cavazione underneath their sword and wound them from there, an action which we've seen before.
What if they cavazione to the inside? Here we go! You "lean against the opponent's debole with a fourth." I really like the use of the word "lean" in this description. Look at how our fencer has dropped their hip and turned their body into their opponent's blade to bring it into a fourth. Fabris points out that the right foot is "somewhat out of line" which just adds to the full-body pressure on the sword. He also makes sure to point out that we should "continue all the way to the opponent's body so as to complete the pass" because of course he does. He also notes that if our opponent attempts a girata to save themselves then their defense will actually be weaker for it and they will be able to be wounded in the flank or even the back.
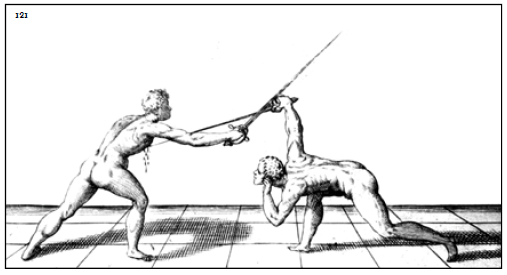
Next up, we show what happens if as we approach to the outside, our opponent's initial action is to raise their hand to parry. Here, we should turn our hand into second before their blade touches ours and lower our body to wound them over their blade and arm as our head and body pass underneath their blade.
As a note, take a look at the orientation of the feet. The hip and body position that this allows is really helpful for getting your body to twist into that position more easily and, let's face it, when it comes to these postures I think we'll all take every bit of help that we can get.
Finally, we're going to look at the last two plates together, because they're essentially a before and after set of shots. Like we've been told before, if our opponent takes on a significantly low guard, we should lower ourselves to match them, and that's exactly what we're seeing here.
We're pulling our right side back - check out that foot and hip orientation again! - and with good weight distribution so we can move forward smoothly.
From there, we end up in the final plate in this rule. Once we get to our opponent's blade, we run up it, here in fourth. If they cavazione, we can pick them up in third on the outside easily. If they raise their blade high, we stay in fourth but end up looking more like Plate 120 as we rise up but remain in fourth.
There we have it! Rule two for the sword alone. Body position, body mechanics, and moving around the point of our opponent's sword are on display here, and they are all really clutch concepts to stay safe as we stroll unceasingly towards our opponent.
Thursday, February 6, 2020
Wednesday, January 22, 2020
Book Two, Single Rapier, Rule Two!
We've made it through the holidays, the holiday funk, the post-holiday illnesses, and the post-holiday funk and here we are, back at it and looking at the second rule of Book Two!
This one is where we start to get a little weird. Fabris describes it by saying that "[t]he principal guard pertaining to this rule is a third formed with the body positioned squarely toward the opponent, the chest wide open and the feet pointing forward. The body is curved and the sword-hand is held near the face. The sword-point is suspended in the air and kept somewhat forward, but not so far forward as to enable the opponent to find it without coming into the misura stretta." The description is pretty straightforward, but just because the first time I read it my reaction was something like, "Okay, I can picture this pretty well but that can't be right..." here's the plate from later on in this rule which illustrates it:
Yup. Just like that - squared off, your hilt and forte up by your face, and your off-hand up by the other side of your face.
We still have the signature hip hinge, with the lower body voided back. We might square off a little if we're using a dagger or cloak, but not at all to this extent. So what is Fabris thinking with this? What's his plan?
The clutch piece of information for using this initial guard for proceeding with resolution is that you initially want to do your best to move towards your opponent on the outside. Circle a bit if you need but try very hard to be on that outside line to the point that "even your sword is out of presence to that side." As you approach your opponent lower your body while keeping your arm in the same position relative to your body, such that when your hilt is by their point, your blade should be in line with them. Do not extend your arm to strike, but keep it in that position and wound them by stepping forward and passing your blade through them that way. (We'll go into why this is a thing later on in another post.)
What if you can't move to the outside because your opponent just won't give you that line? In that case, place your sword to the inside but don't extend the arm in there, either. You'll stay more squared up than not, kind of, but turn your body from the hips to get your blade to cover the inside line. Lower your body, but again, keep your arm in the same position relative to your torso.
Finally, if your opponent keeps their sword really low, just (ha ha, "just") drop your body low enough such that your sword can close theirs out on either line. Fabris does note that if they're positioned to the inside of your blade, you should turn your right side away in a void as you lower yourself.
Fabris goes on to note that you should not use cavazione in this guard save for if your opponent tries to bring his point high to find your blade. In this case, you perform a cavazione of sorts, but not through a motion of the hand or arm - rather, you withdraw your right side similar to what he described in the previous action, which pulls your sword back and keeps it free. As you do this, advance and step off-line with your left foot, which will turn you such that your opponent is now on your outside, and you can proceed in to wound them.
If your opponent tries to parry you, turn your hand to wound them underneath their sword, similar to the previous rule.
Fabris finally notes that while your face and inside are somewhat open, your left hand will protect your face, and if your opponent feints to the inside, you again cover yourself by turning the body rather than moving your arm.
We'll take a look at the additional plates in the next post, which will help illustrate why keeping your arm in the same position is helpful in this rule. They'll also help show us what is to be gained by turning our bodies to cover ourselves, rather than moving the arm. Spoiler: they help us move our torso (which is filled with squishy organs which should not be pierced) around our opponent's point.
This one is where we start to get a little weird. Fabris describes it by saying that "[t]he principal guard pertaining to this rule is a third formed with the body positioned squarely toward the opponent, the chest wide open and the feet pointing forward. The body is curved and the sword-hand is held near the face. The sword-point is suspended in the air and kept somewhat forward, but not so far forward as to enable the opponent to find it without coming into the misura stretta." The description is pretty straightforward, but just because the first time I read it my reaction was something like, "Okay, I can picture this pretty well but that can't be right..." here's the plate from later on in this rule which illustrates it:
![]() |
| Nope. I wasn't kidding. It's a little weird, right? |
We still have the signature hip hinge, with the lower body voided back. We might square off a little if we're using a dagger or cloak, but not at all to this extent. So what is Fabris thinking with this? What's his plan?
The clutch piece of information for using this initial guard for proceeding with resolution is that you initially want to do your best to move towards your opponent on the outside. Circle a bit if you need but try very hard to be on that outside line to the point that "even your sword is out of presence to that side." As you approach your opponent lower your body while keeping your arm in the same position relative to your body, such that when your hilt is by their point, your blade should be in line with them. Do not extend your arm to strike, but keep it in that position and wound them by stepping forward and passing your blade through them that way. (We'll go into why this is a thing later on in another post.)
What if you can't move to the outside because your opponent just won't give you that line? In that case, place your sword to the inside but don't extend the arm in there, either. You'll stay more squared up than not, kind of, but turn your body from the hips to get your blade to cover the inside line. Lower your body, but again, keep your arm in the same position relative to your torso.
Finally, if your opponent keeps their sword really low, just (ha ha, "just") drop your body low enough such that your sword can close theirs out on either line. Fabris does note that if they're positioned to the inside of your blade, you should turn your right side away in a void as you lower yourself.
Fabris goes on to note that you should not use cavazione in this guard save for if your opponent tries to bring his point high to find your blade. In this case, you perform a cavazione of sorts, but not through a motion of the hand or arm - rather, you withdraw your right side similar to what he described in the previous action, which pulls your sword back and keeps it free. As you do this, advance and step off-line with your left foot, which will turn you such that your opponent is now on your outside, and you can proceed in to wound them.
If your opponent tries to parry you, turn your hand to wound them underneath their sword, similar to the previous rule.
Fabris finally notes that while your face and inside are somewhat open, your left hand will protect your face, and if your opponent feints to the inside, you again cover yourself by turning the body rather than moving your arm.
We'll take a look at the additional plates in the next post, which will help illustrate why keeping your arm in the same position is helpful in this rule. They'll also help show us what is to be gained by turning our bodies to cover ourselves, rather than moving the arm. Spoiler: they help us move our torso (which is filled with squishy organs which should not be pierced) around our opponent's point.
Wednesday, December 11, 2019
Wrapping up the first rule for single rapier, and drills for learning it!
So through our last four entries, we looked at some general concepts that Fabris uses in Book Two, and then went through a solid look of his first rule for the sword alone, both text and plates. This entry is pretty much a final wrap for our look at the first rule and some thoughts on it as well as the concepts we're seeing Fabris discuss here, using the first rule as an example of that. Finally, we'll close with some thoughts on how best to drill and practice this rule. This is going to be a bit of a badly-ordered shotgun approach to commentary but here we go!
First we have issues with the physical space that you're fencing in. You need to start out of measure, so if the list is too small, this isn't really an option to use. Most of the time though, lists at the smallest are probably just big enough for you to reasonably attempt using Book Two. What comes up more often are the dreaded list ropes.
If you're in a tournament and you want to use Book Two, you need to know what the rules regarding list ropes are. If a combatant hits the ropes and the rule is to call a hold and recenter, someone who doesn't want to deal with your Book Two Weird Stuff never ever needs to. Granted, this could be a common issue with any kind of fencer who just keeps backing off, but I find that it tends to come up more when faced with an opponent who just keeps walking towards you and doesn't ever stop. Backing up seems like a really great option if you're trying to figure out what to do, and if recentering happens, well, yeah. (Essentially, my understanding of dueling culture in Italy was that if you backed up out of the circle, you both lost and looked like a coward - so combatants had a pretty big disincentive against just backing away from you.) So it's just something to keep in mind.
Similarly, opponents who make really noncommittal attacks or defenses can sometimes be hard to work against with these techniques, though as we'll eventually see, some rules function better than others in those instances. That said, as long as they present their blade in a guard, you'll still have something to work with, even if flushing out a reaction is more difficult.
Additionally, there is a tendency in the SCA as well as other modern rapier combat groups to dislike having your blade pass completely through peoples' bodies and up to your hilt, as Fabris advises.
I know. It's really strange, right?
Regardless, it can lead to some positions where you might not be able to get as far past your opponent's point as you'd like, and you might be left in some risk if they push for a double kill or something like that. In cases like this, you probably have a couple options, which can be used together or separately. First, you can continue forward with your body, but collapse your arm. This could well get you into a safer position. Second, you can turn your guard into a position which more securely covers you from your opponent's blade. This might not work as well when you're yielding around their blade, but in instances where you're passing underneath, turning into prima can be extremely helpful.
Finally, there are occasions where someone just... well, panics. Or does something strange or unwise that Fabris didn't consider. What do you do here? Frankly, a lot of the time, the answer may well simply be "continue forward and strike your opponent, and maybe turn your hand into a guard to cover if you have the tempo for it." The reactions that Fabris describes are both the most likely reactions, and the most reasonable reactions in terms of usefulness and the tempo that they give up. If someone does something that's an extreme and outside those possibilities, they're almost certainly also extremely inefficient actions, which means that you'll have a relatively longer time to react. As long as you continue forward and react in a way in keeping with Fabris' system and the rule that you're applying, you will probably make the correct choice and end up okay.
For measure, there are essentially three stages to approaching our opponent and for consistency we should consider the positions of our feet at each point. First, there is the moment when your point is just beginning to cross your opponent’s blade. At this point, your feet should be in their natural position, with the right foot leading. As you close, your off-side foot will pass ahead. Finally, your sword-foot will pass ahead and you will strike your opponent. If you need slightly more reach, at this time you can take a more extreme step or even a lunge.
Broadly speaking, we’ll be working with the steps between each of those points for these drills - as we move our left foot ahead of our right, and again as we move our right foot ahead. During those steps is when our partner will take the actions we’ll be responding to. When we begin these drills those actions should be quite slow, so as to assure that we can respond while our partner is moving, not after. Fabris’ comment on this is “Carry your sword so close to the opponent’s blade that when the opponent’s sword moves, it will seem to be tied to yours: in other words, one sword’s movement should be quickly followed by the other’s.” We want actions to occur in the same tempo rather than one after the other.
For the purposes of explaining these drills, there are a few conventions to keep in mind. They will be written assuming that you, the reader, are the person proceeding with resolution and that your partner will remain stationary. For ease of learning and performance, both you and your partner will be in Fabris’ extended guard. Begin all your approaches from out of measure, but work them out such that when your swords are just crossing that your right foot is leading, as shown in Plate 109 here; explanation of the drills will begin from this point.. Finally, in the beginning take each step separately, but build towards performing them smoothly before worrying about speed. Let’s begin!
Your Partner Cavaziones
Notes: These options are the first set of possible reactions from your drill partner. We are spacing our partner’s reactions out based on our measure, and will be building out longer plays from there!
A Push From the Inside Line
Notes: Fabris really only considers pushing your blade aside as a reasonable reaction at this point; he doesn’t even consider performing a cavazione at that measure as remotely reasonable.
Consider this as an initial drill idea:
If you want to complicate it further, add a single choice further in:
Once you begin to internalize the flowchart that this rule essentially is, you can begin to extrapolate further for other cases. What if your partner retreats? What if they step forward? The base concepts will still apply, so experiment with these changes and see what they do to the play.
Do these techniques work?
Yup! They can and do. I've pulled them off, I've seen a couple other people pull them off. That said, they are very hard to do well. You really need to maintain that constant forward movement and if you hesitate, even a moderately skilled opponent will probably grab that tempo away from you. Even if it isn't a useful action, or a flinch or panicked movement, it'll be enough to throw off the entire play.Things to keep in mind!
Keep. Going. Forward. No, really. Don't parry, but cover ahead or yield and strike and trust your defense. This is probably the hardest thing to really internalize. That said, this does bring up if there are...Any SCA-related concerns about Book Two?
There are some, yeah. They aren't safety related as such, but are more about the functionality of the technique.First we have issues with the physical space that you're fencing in. You need to start out of measure, so if the list is too small, this isn't really an option to use. Most of the time though, lists at the smallest are probably just big enough for you to reasonably attempt using Book Two. What comes up more often are the dreaded list ropes.
If you're in a tournament and you want to use Book Two, you need to know what the rules regarding list ropes are. If a combatant hits the ropes and the rule is to call a hold and recenter, someone who doesn't want to deal with your Book Two Weird Stuff never ever needs to. Granted, this could be a common issue with any kind of fencer who just keeps backing off, but I find that it tends to come up more when faced with an opponent who just keeps walking towards you and doesn't ever stop. Backing up seems like a really great option if you're trying to figure out what to do, and if recentering happens, well, yeah. (Essentially, my understanding of dueling culture in Italy was that if you backed up out of the circle, you both lost and looked like a coward - so combatants had a pretty big disincentive against just backing away from you.) So it's just something to keep in mind.
Similarly, opponents who make really noncommittal attacks or defenses can sometimes be hard to work against with these techniques, though as we'll eventually see, some rules function better than others in those instances. That said, as long as they present their blade in a guard, you'll still have something to work with, even if flushing out a reaction is more difficult.
Additionally, there is a tendency in the SCA as well as other modern rapier combat groups to dislike having your blade pass completely through peoples' bodies and up to your hilt, as Fabris advises.
I know. It's really strange, right?
Regardless, it can lead to some positions where you might not be able to get as far past your opponent's point as you'd like, and you might be left in some risk if they push for a double kill or something like that. In cases like this, you probably have a couple options, which can be used together or separately. First, you can continue forward with your body, but collapse your arm. This could well get you into a safer position. Second, you can turn your guard into a position which more securely covers you from your opponent's blade. This might not work as well when you're yielding around their blade, but in instances where you're passing underneath, turning into prima can be extremely helpful.
Finally, there are occasions where someone just... well, panics. Or does something strange or unwise that Fabris didn't consider. What do you do here? Frankly, a lot of the time, the answer may well simply be "continue forward and strike your opponent, and maybe turn your hand into a guard to cover if you have the tempo for it." The reactions that Fabris describes are both the most likely reactions, and the most reasonable reactions in terms of usefulness and the tempo that they give up. If someone does something that's an extreme and outside those possibilities, they're almost certainly also extremely inefficient actions, which means that you'll have a relatively longer time to react. As long as you continue forward and react in a way in keeping with Fabris' system and the rule that you're applying, you will probably make the correct choice and end up okay.
How can I practice and drill this thing?
Let's face it, this is probably what you're really here for, right? Okay, let's get to it.Initial concepts for our drills!
Fabris tells us to use “ordinary steps” to approach our opponent, so we’ll rely on passing steps for our drills. While he also says to bend your body while raising and extending your sword as you approach your opponent, we’ll dispense with that for the time being so as to reduce the number of details you’ll need to keep in your head.For measure, there are essentially three stages to approaching our opponent and for consistency we should consider the positions of our feet at each point. First, there is the moment when your point is just beginning to cross your opponent’s blade. At this point, your feet should be in their natural position, with the right foot leading. As you close, your off-side foot will pass ahead. Finally, your sword-foot will pass ahead and you will strike your opponent. If you need slightly more reach, at this time you can take a more extreme step or even a lunge.
Broadly speaking, we’ll be working with the steps between each of those points for these drills - as we move our left foot ahead of our right, and again as we move our right foot ahead. During those steps is when our partner will take the actions we’ll be responding to. When we begin these drills those actions should be quite slow, so as to assure that we can respond while our partner is moving, not after. Fabris’ comment on this is “Carry your sword so close to the opponent’s blade that when the opponent’s sword moves, it will seem to be tied to yours: in other words, one sword’s movement should be quickly followed by the other’s.” We want actions to occur in the same tempo rather than one after the other.
Drill Conventions
For the purposes of explaining these drills, there are a few conventions to keep in mind. They will be written assuming that you, the reader, are the person proceeding with resolution and that your partner will remain stationary. For ease of learning and performance, both you and your partner will be in Fabris’ extended guard. Begin all your approaches from out of measure, but work them out such that when your swords are just crossing that your right foot is leading, as shown in Plate 109 here; explanation of the drills will begin from this point.. Finally, in the beginning take each step separately, but build towards performing them smoothly before worrying about speed. Let’s begin!Initial Approach
Approaching Your Partner on the Inside
Notes: These are the fundamental actions that every other drill will be based on. In this case, there is only a single minor point of difference as to whether you begin on the inside or outside line. As the drills grow more complicated, the line you begin on will have a greater impact on how the drill progresses.
- From your initial approach, find your partner’s sword on the inside.
- Take your first passing step. Begin forming a more distinct terza-quarta bastard guard to consolidate your finding to the inside.
- Take your second passing step, leaving your hand in the terza-quarta bastard guard as you strike your partner.
- You are running your blade along and on top of your partner’s blade; in this instance you should not need to turn fully into quarta, though doing so is absolutely permissible if that’s what you need to close the line.
- From your initial approach, find your partner’s sword on the outside.
- Take your first passing step. Remain in terza for this; you can successfully control your partner’s blade from that guard.
- Take your second passing step, striking your partner.
- Note that you will be remaining in terza and as such you will be forcing your partner’s sword down and dominating them from above, rather than pushing them upward as with seconda or quarta.
Notes: These are the fundamental actions that every other drill will be based on. In this case, there is only a single minor point of difference as to whether you begin on the inside or outside line. As the drills grow more complicated, the line you begin on will have a greater impact on how the drill progresses.
Reactions in Wide Measure
At this point, the drills will take their first complication, that of your partner performing an initial action while you are approaching from wide measure.Your Partner Cavaziones
- Approach your partner having found their sword as above.
- As you take your first passing step, your partner performs a cavazione.
- As they perform their cavazione you should contracavazione.
- This should place you back on your original line as you finish your step, just as you were in the initial drill above.
- Continue with your second passing step, striking your partner.
- Approach your partner having found their sword as above.
- As you take your first passing step, your partner pushes against your blade in an attempt to counter-find or simply to push you off-line.
- As they begin to push, you should cavazione to the other line.
- If you began on the inside line, you will now be on the outside line, and vice-versa.
- Continue with your second passing step, striking your partner.
- Remember that you are on a different line than you began in; adjust your guard accordingly!
Notes: These options are the first set of possible reactions from your drill partner. We are spacing our partner’s reactions out based on our measure, and will be building out longer plays from there!
Reactions in Narrow Measure
When we enter narrow measure, our partner really has only one reaction that they can make - they push against your blade. While the reaction to the push on either line involves the same guard, it is utilized differently for each line.A Push From the Inside Line
- Find your partner’s sword on the inside and approach them as usual. They will not react for your first step, allowing you to close to the edge of narrow measure.
- As you take your second passing step, your partner will push against your blade in an attempt to parry you or simply push you off-line.
- As they begin to push turn your hand into an angled seconda so as to yield around their push. Their blade should well fall into the space you create with the angle of your blade.
- Finish your step and strike your opponent.
- Find your partner’s sword on the outside and approach them as usual. They will not react to your first step, allowing you to close to the edge of narrow measure.
- As you take your second passing step, your partner will push against your blade in an attempt to parry you or simply push you off-line.
- As they begin to push turn your hand into seconda while you perform a half-cavazione and drop the point of your sword under their blade, without moving your hand’s placement relative to their blade.
- Finish your step and strike your opponent.
Notes: Fabris really only considers pushing your blade aside as a reasonable reaction at this point; he doesn’t even consider performing a cavazione at that measure as remotely reasonable.
Putting It All Together
At this point, drilling this rule takes on a bit of an IKEA assembly feel. We have our choice of options at each measure:- Wide Measure
- Do nothing
- Cavazione
- Push
- Narrow Measure
- Do nothing
- Push
What we want to do at this point is assemble an entire flow from beginning to end, using the options above. For instance, we could assemble the following process:
Additionally, you can discuss with your partner what could cue them to take one action over another. Why might they push against your blade rather than cavazione? Is there anything you could do that might cause them to take no action at all as you approach?
- Start finding your partner on the inside line.
- At wide measure, they cavazione. The proper response is to contracavazione.
- This leaves us on the inside line.
- At narrow measure, they push. The proper response is to yield in seconda.
- Strike your partner.
- Start finding your partner on the outside line.
- At wide measure, they do nothing.
- At narrow measure, they push. The proper response is to turn underneath their blade in seconda.
- Strike your partner.
Additionally, you can discuss with your partner what could cue them to take one action over another. Why might they push against your blade rather than cavazione? Is there anything you could do that might cause them to take no action at all as you approach?
Advanced Options
Once you are comfortable running through fully scripted flows, you can begin to introduce choice. Do this more gradually than you think you need to - it’s extremely easy to introduce too much cognitive load too quickly, which will just lead to frustration. Also, be prepared to slow the drill back down, simply because you will likely be actively thinking about and considering your options, rather than reacting reflexively. Being thoughtful is good at this point, but it isn’t fast. Finally, remember that the choices you add will cascade further down the flow - for instance, if you introduce the possibility of changing lines during the wide measure, at narrow measure you will need to be prepared for the inside or outside option.Consider this as an initial drill idea:
- Approach your partner as usual. When you cross wide measure, your partner may cavazione or do nothing.
- If they cavazione, you will contracavazione during their movement.
- If they do nothing you will begin running your blade along theirs.
- When you reach narrow measure, your partner will do nothing. You will continue running your blade along theirs and strike them.
If you want to complicate it further, add a single choice further in:
- Approach your partner as usual. When you cross wide measure, your partner may cavazione or do nothing.
- If they cavazione, you will contracavazione during their movement.
- If they do nothing you will begin running your blade along theirs.
- When you reach narrow measure, your partner will push against your blade or do nothing.
- If they push against your blade you will turn into seconda according to whether you are on the inside or outside line.
- If you are on the inside line, turn into an angled seconda, yielding around their blade, and strike them.
- If you are on the outside line, turn your hand into seconda and perform a half-cavazione with your point, striking them underneath their guard.
- If they do nothing, continue to run your blade along theirs and strike them.
Final Drilling Thoughts
As we've seen in previous posts, there are some additional interesting edge cases within rule one. These include such things as your opponent being in a very low guard with a withdrawn body or your opponent performing a cavazione over your blade. Even with these varied circumstances, the broad concept of the rule will apply, so I encourage you to read the manual and try constructing basic drills around them for yourself.Once you begin to internalize the flowchart that this rule essentially is, you can begin to extrapolate further for other cases. What if your partner retreats? What if they step forward? The base concepts will still apply, so experiment with these changes and see what they do to the play.
Next Up!
I'm hoping to give us a similar look at the second rule for the sword alone, which begins with one of Fabris' really oddball postures. (Yes, really oddball for Fabris. I know, right?) It may not happen before the holidays land on us, but stranger things have happened!
Wednesday, November 20, 2019
Book Two - Plates for the First Rule for the Sword Alone
I have two arms again! I can type! This is amazing and I'm excited, so let's dive in.
We've covered the broad theory of how Fabris wants us to proceed with resolution, and gone through the flowchart for his first rule of the sword alone. Before he wraps the first rule up though, he goes through some plates which illustrate a couple key moments in the rule that he described, as well as a couple edge-case scenarios which could come up during our attempt to apply the rule as written. This post is going to be a pretty straightforward look through these, which will wrap the initial walkthrough of the first rule. (We're still going to have a post that will consist of me going on about applications, weird SCAisms, and other things about this rule and the concept of Proceeding With Resolution in general, and whatnot. Truly the platonic ideal of the title of this whole blog.)
Here's the first plate that Fabris brings up, and it's a really straightforward image. "This illustration shows how to gain the first advantage as you proceed against the opponent
without waiting for a tempo." He does note that if your opponent gives you a tempo, you should absolutely take it. (Why not, right?) He also points out that the advantaged fencer here is on the left; having your sword on top of your opponent's is in his words "always better than being below it."
There is a really excellent point that he brings up in the accompanying text, though: "If the opponent’s sword is in an angled third guard or in fourth guard, you should still start in the
manner pictured. Only, instead of running the length of his blade with your point, you should proceed with your edge in a straight line from your point to his body, wounding him through that opening created by the angle of his sword (inside or outside depending on the guard)." Simply put, if your opponent's blade is pointing directly at you - as Fabris assumes to some degree in the broad applications of the rule - then you can easily run your blade along the length of theirs. On the other hand, if their blade is angled either vertically (an angled third) or horizontally (an angled fourth) then you really can't run it along the length of the blade in the same way. In that case, you should use the principle of a straight line defeating an angle, which he covers all the way back in Chapter 14.
We're going to look at the next two illustrations together, mostly because they're both described as conclusions which derive from the initial advantage shown in Plate 109 above. Plate 110 is extremely straightforward and shows what happens if we just run our blade straight along that of our opponent, and all they end up doing is panicking and trying to pull their body back and parry at the last moment. (It happens more often than you might think.) Fabris notes that the illustration as shown is what happens if we find their blade on the inside. If it happens on the outside, it would look very similar save that we'd be in Third and their blade would be pushed down rather than up.
Plate 111 is more interesting! In this case, we're on the inside line and we've passed with our left foot as our opponent tries to push our blade aside. As we pass forward with our right foot, we yield to the attempted parry by turning into an angled Second; their blade drops off to the side, we continue forward and strike them. If we were on the outside line when our opponent pushes into our blade, we'll turn our hand into Second as we drop our point below their hand (while keeping our hand at the same height that it started at) and continue passing forward to strike them.
Fabris takes this opportunity to go into some additions and clarifications to the core rule. Specifically:

We're going to look at Plates 112 and 113 together as well, because they bookend a single situation - specifically "how to gain the advantage against someone set in a low guard with the high (and most vulnerable) parts of his body held back."
I'm going to go into more detail about this and similar situations in the blog post following this one because let's be honest, we see some similar - though importantly, not identical - situations in the SCA with regularity. For now, we're going to focus on the situation as Fabris presents and describes it. Plate 112 illustrates the concept of "pointing your sword towards the danger" though note that our sword is still above our opponent's. As we pass forward, our goal will still be to run our blade along the length of theirs, which we'll accomplish by angling our sword as we close such that our hilt will end up where our point begins, and our blade will parallel our opponent's, as we can see in the following plate. Through this whole process, our point will remain above their blade. If our opponent tries to perform a cavazione - which in this case would be moving their sword above ours to change the line - Fabris states that we should stop lowering our hilt and simply move straight in to wound them, because their reach will be so short owing to their body position. In fact, in Plate 113 Fabris notes that due to the blade and body positions it's entirely likely that we'll simply end up interrupting our opponent's attempt to cavazione simply because our hilt will be right there, and we can proceed to wounding them immediately.
Three more plates! We're almost done!
At a quick glance, Plate 114 looks similar to Plate 109. However, the key difference is that our opponent is beginning in Second rather than Third. Fabris describes running along the opponent's blade as usual, but we can discern from the text that we should be on the inside of our opponent's guard. As we run along their blade, we progressively turn our hand into Fourth, and end up with our point somewhat lower than our guard, as we see in Plate 115, the conclusion to this action.
It's interesting, because Third is typically a guard used to cover the outside line. However, in this action it works owing to a couple of different things. First, Fabris specifies that we don't actually make contact with our opponent's blade with our blade, but with the hilt when we reach that point. Secondly, we smoothly turn into a guard of Fourth, which will neatly cover our inside line when it's necessary that we have the cover.
In Plate 115, Fabris notes how it is the conclusion of the play begun in Plate 114, but adds that the reason this (and the other actions in this section) work is because of our continuous forward motion. If we hesitate and miss the tempo our opponent creates with a cavazione, we will not arrive in time and our opponent could manage a counter to our action.
Lastly, we have Plate 116, and it is one of my favorites. It's a wound in First and to the outside, against a Second. It begins just as the first rule describes, with our sword extended and our opponent's sword on the inside. As we approach, our opponent performs a cavazione to the outside, and Fabris specifies "over" our sword. As we pass forward with our right foot, we turn our hand from Third to First, cutting our opponent off from completing their cavazione.
Fabris notes that "this happens because the opponent allows our fencer to proceed too far forward before starting the cavazione. Had he performed it immediately, our fencer would have had to resort to a contracavazione and an attack in fourth." Certainly he's not wrong here, but I do think that a similar take on this plate can happen even with a cavazione underneath if the timing is a little bit off. Also, the variation on Plate 111 with our fencer in Second and wounding our opponent underneath their blade can turn into something that looks a lot more like Plate 116 without too much effort, and can afford us with more safety in an SCA-related context, where people frown upon passing our blade all the way through our opponent's body up to the hilt.
That brings a close to Fabris' first rule for the sword alone! Like I mentioned above, the followup post to this will be a discussion of the application of this, musings on using it in the SCA or similar contexts, extrapolations, takeaways, and other related bits and bobs.
We've covered the broad theory of how Fabris wants us to proceed with resolution, and gone through the flowchart for his first rule of the sword alone. Before he wraps the first rule up though, he goes through some plates which illustrate a couple key moments in the rule that he described, as well as a couple edge-case scenarios which could come up during our attempt to apply the rule as written. This post is going to be a pretty straightforward look through these, which will wrap the initial walkthrough of the first rule. (We're still going to have a post that will consist of me going on about applications, weird SCAisms, and other things about this rule and the concept of Proceeding With Resolution in general, and whatnot. Truly the platonic ideal of the title of this whole blog.)
Here's the first plate that Fabris brings up, and it's a really straightforward image. "This illustration shows how to gain the first advantage as you proceed against the opponent
without waiting for a tempo." He does note that if your opponent gives you a tempo, you should absolutely take it. (Why not, right?) He also points out that the advantaged fencer here is on the left; having your sword on top of your opponent's is in his words "always better than being below it."
There is a really excellent point that he brings up in the accompanying text, though: "If the opponent’s sword is in an angled third guard or in fourth guard, you should still start in the
manner pictured. Only, instead of running the length of his blade with your point, you should proceed with your edge in a straight line from your point to his body, wounding him through that opening created by the angle of his sword (inside or outside depending on the guard)." Simply put, if your opponent's blade is pointing directly at you - as Fabris assumes to some degree in the broad applications of the rule - then you can easily run your blade along the length of theirs. On the other hand, if their blade is angled either vertically (an angled third) or horizontally (an angled fourth) then you really can't run it along the length of the blade in the same way. In that case, you should use the principle of a straight line defeating an angle, which he covers all the way back in Chapter 14.
We're going to look at the next two illustrations together, mostly because they're both described as conclusions which derive from the initial advantage shown in Plate 109 above. Plate 110 is extremely straightforward and shows what happens if we just run our blade straight along that of our opponent, and all they end up doing is panicking and trying to pull their body back and parry at the last moment. (It happens more often than you might think.) Fabris notes that the illustration as shown is what happens if we find their blade on the inside. If it happens on the outside, it would look very similar save that we'd be in Third and their blade would be pushed down rather than up.Plate 111 is more interesting! In this case, we're on the inside line and we've passed with our left foot as our opponent tries to push our blade aside. As we pass forward with our right foot, we yield to the attempted parry by turning into an angled Second; their blade drops off to the side, we continue forward and strike them. If we were on the outside line when our opponent pushes into our blade, we'll turn our hand into Second as we drop our point below their hand (while keeping our hand at the same height that it started at) and continue passing forward to strike them.
Fabris takes this opportunity to go into some additions and clarifications to the core rule. Specifically:
- If your opponent tries to parry and break measure the moment your blades cross, cavazione and keep going from the beginning. If he tries to parry that early in the action and doesn't break measure, cavazione and continue.
- If he tries to parry again from there then turn your hand into Second like he just described and wound him.
- When you're initially stepping in if your opponent performs a cavazione and attacks you (the first time this possibility has come up!) stay in Third or Fourth (depending on if you're on the outside or inside, respectively) and strike him through the cavazione.
- If your opponent performs a cavazione and breaks measure, then contracavazione and continue. (We've been over this.) On the other hand, if he performs a ricavazione then you should be able to "defend with little motion."
- If he tries to parry during the first cavazione, you should be able to push through in Third or Fourth, as appropriate.

We're going to look at Plates 112 and 113 together as well, because they bookend a single situation - specifically "how to gain the advantage against someone set in a low guard with the high (and most vulnerable) parts of his body held back."
I'm going to go into more detail about this and similar situations in the blog post following this one because let's be honest, we see some similar - though importantly, not identical - situations in the SCA with regularity. For now, we're going to focus on the situation as Fabris presents and describes it. Plate 112 illustrates the concept of "pointing your sword towards the danger" though note that our sword is still above our opponent's. As we pass forward, our goal will still be to run our blade along the length of theirs, which we'll accomplish by angling our sword as we close such that our hilt will end up where our point begins, and our blade will parallel our opponent's, as we can see in the following plate. Through this whole process, our point will remain above their blade. If our opponent tries to perform a cavazione - which in this case would be moving their sword above ours to change the line - Fabris states that we should stop lowering our hilt and simply move straight in to wound them, because their reach will be so short owing to their body position. In fact, in Plate 113 Fabris notes that due to the blade and body positions it's entirely likely that we'll simply end up interrupting our opponent's attempt to cavazione simply because our hilt will be right there, and we can proceed to wounding them immediately.
Three more plates! We're almost done!
At a quick glance, Plate 114 looks similar to Plate 109. However, the key difference is that our opponent is beginning in Second rather than Third. Fabris describes running along the opponent's blade as usual, but we can discern from the text that we should be on the inside of our opponent's guard. As we run along their blade, we progressively turn our hand into Fourth, and end up with our point somewhat lower than our guard, as we see in Plate 115, the conclusion to this action.It's interesting, because Third is typically a guard used to cover the outside line. However, in this action it works owing to a couple of different things. First, Fabris specifies that we don't actually make contact with our opponent's blade with our blade, but with the hilt when we reach that point. Secondly, we smoothly turn into a guard of Fourth, which will neatly cover our inside line when it's necessary that we have the cover.
In Plate 115, Fabris notes how it is the conclusion of the play begun in Plate 114, but adds that the reason this (and the other actions in this section) work is because of our continuous forward motion. If we hesitate and miss the tempo our opponent creates with a cavazione, we will not arrive in time and our opponent could manage a counter to our action.
Lastly, we have Plate 116, and it is one of my favorites. It's a wound in First and to the outside, against a Second. It begins just as the first rule describes, with our sword extended and our opponent's sword on the inside. As we approach, our opponent performs a cavazione to the outside, and Fabris specifies "over" our sword. As we pass forward with our right foot, we turn our hand from Third to First, cutting our opponent off from completing their cavazione.
Fabris notes that "this happens because the opponent allows our fencer to proceed too far forward before starting the cavazione. Had he performed it immediately, our fencer would have had to resort to a contracavazione and an attack in fourth." Certainly he's not wrong here, but I do think that a similar take on this plate can happen even with a cavazione underneath if the timing is a little bit off. Also, the variation on Plate 111 with our fencer in Second and wounding our opponent underneath their blade can turn into something that looks a lot more like Plate 116 without too much effort, and can afford us with more safety in an SCA-related context, where people frown upon passing our blade all the way through our opponent's body up to the hilt.
That brings a close to Fabris' first rule for the sword alone! Like I mentioned above, the followup post to this will be a discussion of the application of this, musings on using it in the SCA or similar contexts, extrapolations, takeaways, and other related bits and bobs.
Tuesday, October 29, 2019
Book Two, Starting To Map Out the Rules
This entry took longer to post up here mostly because I'd thought to myself "I can just set up a flowchart to illustrate this!" Sadly, the software that I tried to use for this was a pain and I spent far too long banging my head against it, so I'm back to words. Maybe in a later post you'll see a picture of my illegible scribblings which if you squint are sort of like a flowchart, if you're being generous. Also, it has just been super hard to actually be able to focus on writing for the past few days. Change in season, probably.
Anyway, onward! We previously discussed how the methodology of Book Two is an exercise in placing your opponent into obedience while collapsing measure. Let's take a look of Fabris' first rule for proceeding with resolution with the single sword and try to map this out!
Each rule that Fabris describes is structured similarly - there's a section that's a description of the process described from an initial guard that you've adopted as you approach the opponent from out of measure, along with how to handle the opponent's general responses. The plates which follow reinforce that, but can also describe variations or edge cases which can derive from that initial situation.
Broadly speaking, Fabris works with three ranges of measure for the rules. There's just outside of measure, wide measure, and narrow measure. He wants you to walk with an "ordinary step" towards your opponent, bending your body and raising your sword as you do. For the first rule, he wants you to take his guard with the arm extended, with your sword on your opponent's weaker side. When your points are just beginning to cross, your blade should be "slightly above and stronger than his without requiring any further motion." You should keep your blade as close to possible to your opponent's while still avoiding any blade contact. This is where the action really begins.
Let's pause here and review a couple key points before we continue. First, when Fabris says an "ordinary step" he clarifies that what he means is that you should be "moving your feet at an ordinary
step, as if you were walking - only quicker and with smaller strides." The plates illustrate the fencers standing with their feet at the typical 90 degree angle though, so I'm assuming that as you assume your guard, you will do so with your entire body. That said, I've found that you should continue one foot in front of the other as you progress, rather than the front foot/back foot fencing advance step. Additionally, Fabris points out that your "step should not be widened until the point of your sword reaches the opponent." No lunging or taking a sudden deep passing step until you are in the moment of wounding your opponent, at which point you should suddenly drive your sword through them to the hilt, as per usual.
Second, the blade position is important. You want to have your sword in a straight line, over your opponent's sword on whichever side is the weakest - the rule doesn't specify that you need to start inside or outside at all! You simply need to start having found your opponent's blade.
Finally, the plates depict our example fencer from this starting position with their feet uncrossed - their sword foot is leading, and the off-side foot is behind. Ideally, I admit that it's easier to begin here as you work your way through the rule. This is fairly simple to achieve in a structured practice while you work through this step by step with a partner, but it's much harder to achieve with precise certainty in a bout. As long as you are controlled and have a solid grasp of your measure though, you should readily fall within the bounds of "close enough to make it work" and that's really all that we can ever ask for. With that, let's take a look at the step-by-step process here.
First, we have the most straightforward option available to us - if our opponent does nothing, we run our sword along theirs until we strike them. We want to get our hilt to the point that our sword crossed theirs, and then keep right on going. Fabris does point out that we want to stay on top of their sword if at all possible; this is simple enough if they remain in third or fourth. If they decide to set up in first or second, we can run along their blade to the inside or outside, wherever their blade is weaker.
As straightforward (and frankly, rare) as this option is, Fabris does hammer home an important point regarding our forward movement. We should run along our opponent's blade with a smooth and continuous forward motion. We shouldn't pull our arm back, nor should we fling our arm or body forward. We should just ensure that our blade is more strongly positioned such that we cannot be displaced.
If from the moment of crossing our opponent retreats, we should simply continue to advance smoothly forward. In effect, we continue to engage at this measure for somewhat longer. If they attempt to push our sword away or gain our blade, a small cavazione is all that is needed to ensure that we continue forward safely. Once that set of steps is done, we're essentially right back where we started, and can proceed safely from there.
If as we're stepping into narrow measure our opponent tries to push our blade out of line, we'll be turning into second. If we happen to be on the outside, we'll lower our body and turn into second while performing a small half cavazione, dropping our point underneath their blade without moving our hand and wound them. If we're on the inside, we'll still turn into second, effectively yielding around their push, letting their blade drop way out of our presence, and wound them.
If they try to cavazione in narrow measure? Honestly, Fabris doesn't even specify and that's probably because it's simply an awful idea - if they do though, I'd just turn my hand to pick them up on the other side, or even as they perform the cavazione and strike them.
Finally, if they try to break measure and change guards? Fabris says that you can also break measure and start all over again... or you can keep progressing forward and follow their sword with the tip of yours and just keep on with the progression we've already outlined here.
That's it! That's the basic procedure for the first rule of proceeding with resolution with the sword alone! Next time we'll look at the plates attached to this rule, and possibly poke at a couple of the problems we might run into putting this into practice in a modern SCA context before we move on to the second rule of the sword alone - which has us beginning in "a third formed with the body positioned squarely toward the opponent, the chest wide open and the feet pointing forward" so that'll be fun to see!
Thursday, October 10, 2019
Book Two: Tempo and Measure
Let's keep talking about Fabris' Book Two and dive right in!
In my last post, I described Book Two as "an advanced exercise in management of both tempo and measure while requiring a high degree of internalization of the practical applications of Fabris' theory as demonstrated in the various plays he describes." I still think that's a pretty decent concise summary, but what does it mean?
At heart, I don't think that there's anything in Book Two which directly contradicts the rest of Fabris' manual. He points out that "it is very important to know how to wait for a tempo and an opportunity to attack: from this proceeds the knowledge of measures, tempi, contratempi, as well as the understanding of all the deceptions and artifices that can come from the opponent." However, Fabris notes that "I rather think that when you have the advantage, it is much better to proceed without waiting for anything else, reassured by the fact that the opponent cannot harm you from his current position." Essentially, once you have gained the advantage over your opponent - which is to say in a general sense that you have found their blade - you should be safe to immediately proceed to wounding them. (Granted, this can itself an accomplishment which requires multiple steps, but we'll get to that later on in this process.)
Fabris describes a few common errors which we've all seen, and probably commit on a regular basis. There are fencers who wait for their opponent to move and give a tempo even if they have found their opponent's sword and there are fencers who don't attempt to find their opponent's sword at all but rely solely on feints and invitations. For the latter, Fabris points out that "If you think about this strategy, you can see that it involves making a tempo in order to provoke a tempo from the opponent. Therefore, the first tempo is also the first danger. No matter how small, it will at the very least provide the opponent with an opportunity to gain some advantage..."
These two points are key to seeing what Fabris is thinking with Book Two. If you have the advantage of the opponent, you should proceed to wounding them without waiting. You should not wait for them to hand you a tempo, as you have already found their blade. You should not ignore finding their blade and try to proceed by allowing them to give you a tempo that you can try to move inside of. So where does this bring us?
"What we are looking for here is a way to attack the opponent immediately after unsheathing the sword, without stopping and without regard to the opponent’s guards, postures, tempi, parries, attacks, advances or retreats. In short, the opponent should be utterly powerless to stop your attack under all circumstances." Again, how does proceeding with resolution accomplish this? "The advantage comes from your ability to put the opponent into obedience and force him to do as you wish, whether he tries to defend or counterattack. If you know how to do this, everything else will be easy, because you will be able to foresee your opponent’s actions."
Oh.
At heart, once you have found your opponent's sword, you have ideally placed them under some degree of obedience - there are only a finite number of reasonable actions for them to take, and ideally you are able to counter them with a more efficient and therefore faster response. What Fabris is suggesting is that if you do this while smoothly closing with your opponent, their potential array of reactions will grow more and more limited until none remain to them, and they are wounded.
This is different from stepping closer to one's opponent in a more conventional fashion because there is no pausing. There's no waiting, no drawing them out and seeing how they react. This means that as you close measure and your opponent reacts, you must be already moving to counter them. "Carry your sword so close to the opponent’s blade that when the opponent’s sword moves, it will seem to be tied to yours: in other words, one sword’s movement should be quickly followed by the other’s. If your opponent’s sword gets away from you, the tempo will be lost, and if you were to chase it while going forward you may be wounded."
If you are moving towards your opponent at a steady walking pace, ideally one of two things will be happening to the measure - it will be collapsing if they remain still or if they decide to approach you in turn, or it will remain the same if they retreat. As you initially enter an extremely wide measure, you move into position such that you have found the blade of your opponent. At that point, they react - and you will continue to move forward and continue to make yourself safe according to all the principles that Fabris has already outlined in the rest of his book. They will continue to react, and you will continue to keep yourself safe, until you are close enough to strike them in a single movement.
Because the measure will be collapsing and the available tempi will be shrinking - sometimes extremely rapidly, especially if your opponent decides to advance as well - you will need to have a very clear understanding of the relative positions of your blades and your bodies, as well as what the most efficient counter to the possible movements of your opponent are. While you can simply go back to the rest of Fabris' manual and piece together what the plates say about the various movements your opponents can make at various measures, Fabris does a lot of that work for us by assembling his Rules. Each Rule that he describes is structured in a really interesting way, and I'm going to start pulling one of them apart in my next post.
Monday, October 7, 2019
Some Short Initial Book Two Thoughts!
This entry doesn't really have a point, per se, but I wanted to get some rambling thoughts out there. I've been trying in fits and starts to write up a paper on Fabris' Book Two. It isn't like there's a shortage of material in there to work with, and the secondary sources which are just past period are likewise pretty helpful.
Rather than just trying to outline a paper and build out flowcharts for the various rules that Fabris presents (so... many... flowcharts...) I thought it'd be a bit more productive for me to just start throwing some initial thoughts on the material from a pretty high view, and try to use that as a basis for going forward. (With more blog entries in, hopefully, increasing detail.)
So, onward. Book Two!
The key concept that Fabris describes in Book Two is what he calls "proceeding with resolution." If I were to put it very simply, I'd describe it as "walking calmly towards your opponent without stopping, and murdering them while you pass them." It's usually a bit more frenetic than that, but the moments where you can just do this smoothly and almost slowly are wonderful.
Of course, it's a lot more complicated than that.
At it's heart, I think the best meaningful summary is that proceeding with resolution is an advanced exercise in management of both tempo and measure while requiring a high degree of internalization of the practical applications of Fabris' theory as demonstrated in the various plays he describes. Which is a bit more helpful than my pretty flip description of it above, but probably not by much. So let's break it down even more.
First, let's see what Fabris himself says about proceeding with resolution: "I do not want to take anything away from the techniques of which I have spoken thus far. They are all important and good to know. However, in this part of the book I will set them aside. What we are looking for here is a way to attack the opponent immediately after unsheathing the sword, without stopping and without regard to the opponent’s guards, postures, tempi, parries, attacks, advances or retreats. In short, the opponent should be utterly powerless to stop your attack under all circumstances. This mode of operation, with all its requirements, will make you safer by far than if you waited in your guard."
Sounds good, right? It is good. It's also hard but very rewarding. I'm going to hit post on this pretty short entry here, and over the next couple of days put together an initial introduction to how the concepts in book two work on a broad level, and then maybe map out the first rule of the sword alone, and keep the posting momentum going now that I've found it again!
Subscribe to:
Posts (Atom)