Let's make some progress here! With this, we're hitting the halfway point of the rules for the sword alone.
No need for more of an introduction so here we go!
Fabris opens by touching on some advantages and disadvantages of the first two rules. For the first rule, he says that it is good because it lets us gain an advantage from farther away. On the other hand, he says that we might give away our strategy too soon, and that our opponent could manage to change things up enough or otherwise find the time to somehow save themselves. This seems fair, and it does square with the instances in which Fabris tells us that we may need to withdraw and try again, or that our opponent could retreat enough to effectively break engagement.
The second rule he describes as good because it really only allows for a single opening, which is close enough to our sword hand that our opponent can't attack it without essentially attacking through our forte. Because of this, we've reduced our decision tree to "our opponent does a really bad idea for themselves" and that's that. It also keeps our sword free and we don't need to worry about performing lots of cavazione, unlike the first rule. On the other hand, he describes it as "laborious" and keeping the arm almost completely immobile is just plain tiring after not all that much time.
Keeping these issues in mind, Fabris describes the third rule as one that will not give away our strategy until far too late, so that our opponent will not be able to move themselves or parry until it is too late. The method that Fabris tells us will accomplish this is this: since our opponent by definition can't wound us until we're in measure, we will not assume a guard at all until we are stepping into measure. We will be approaching our opponent to the outside without being in guard or having our sword in any particular position. As we are stepping into measure with either foot (Fabris specifies "when you lift your foot to step into measure") we will place our forte against our opponent's debole to shut them out of line without stopping, at which point we - as we might expect - are to run along our opponent's blade with our sword without stopping or flinging out our arm.
There aren't any specific details of stances and movements there, but given that we aren't told to form any specific guard as yet, that makes sense. Still, it does feel like it's more theory and less application as yet, so let's see where we go from here.
Fabris then tells us that if we end up on the inside and our opponent tries to parry we - and this will not remotely surprise people who have been reading along up to this point - "should change from third to second, lower [our] body as [we] proceed forward and wound [our] opponent in the tempo of the parry." Nothing remotely surprising here, and in fact this is pretty much right out of rule one, as well as other plays that Fabris illustrates in the first book of his manual. Fabris points out that our opponent will not be able to bring his point back into line but does state that if we have any hesitation or break in our motion after we find their sword then our opponent will be able to find the time to return their blade to line because of that slowing of our action.
So far, so good. Straightforward and we don't have any real surprises yet.
Fabris says we can apply "the same resolution" in passing if our opponent tries to parry without breaking measure as we find their sword - just turn to second underneath, and pass to wound them before they can apply any pressure to our blade. On the other hand, if they retreat as they parry we should cavazione before they touch our blade. This will essentially place us in a starting position, albeit on a different line, and we can continue as normal.
At this point, Fabris points out that we want to avoid "making any motions contrary to a cavazione." For instance, if we make the first motion toward our opponent's blade, we cannot also cavazione in that tempo. If we suddenly lower our hand, we can't bring it back up. In general, this is good advice to remember, but when we're playing games with collapsing our measure and tempo like this, we can't afford to waste any motion.
He goes on to describe how, if we have good enough control over our blade to be able to change the original motion into another one, we can "perform a splendid deception" on our opponent. (Sounds like feinting but okay Fabris, let's hear it.) "As soon as you place your foot in measure, you gain the opponent’s sword. As he tries to meet your blade and resist to it, you deceive him with a cavazione and proceed forward with the other foot, so that he cannot return in line. All he can do at this point is to try to wound you under your sword with a half-cavazione, but you can avoid this danger by simply lowering your point and your body to the same side of his sword. This keeps him out of line as you push your attack home." Okay that's... pretty straightforward and not out of keeping with anything we have so far, really. It seems a bit more... hm. Proactive is the best word I can come up with off the cuff as I write this, but I'll work on it. It seems a bit more proactive than how Fabris has set up his rules so far, which generally seem to be more in the vein of "I have placed my opponent in a no-win scenario and have a response for whatever they might do" as opposed to "I'm going to feint on the way in" but even still, I can get there.
Fabris then says that if our opponent performs a cavazione as we find their sword, or comes forward, we'll just wound them in that tempo. If they break measure as they cavazione to find our sword, we should just contracavazione and keep right on going forward and wound them. If they change their guard while breaking measure, we keep moving forward but we place our sword against theirs such that we can keep running our sword along theirs. Light on details, but straightforward enough with what we've seen in the previous rules.
Moving on, we are told that we should keep the measure in mind, and that it should make us aware of potential offenses or defenses that we might see, and that we should be prepared for them. Sure, okay, good advice but again, not so much with the details.
Fabris does say that he's not going to discuss what to do if our opponent completely breaks measure or they just lean away, because they're not threats. Likewise if they try to cut, we can wound them as they prepare the cut and that's that. If they're moving away as they do this, he says that we can just parry in fourth or second or void the cut and strike them.
He closes by pointing out that this rule requires a very refined understanding of measure. This certainly seems true, as we need to be able to know when we are about to enter our opponent's measure so that we can be entering a guard as we do so, and to be aware of what our opponent can accomplish at any point in the closing of measure.
All that said, this rule so far really reads to me as what would happen if the first rule had a lot of the flowcharts stripped out of it and more or less simply had "do what you need to do" added in. This would be terrible as a first rule, but in terms of following the first and second, it really seems much more like presenting an alternate way to implement the principles that we saw in there, which is great.
Soon, the plates!
Saturday, February 8, 2020
Thursday, February 6, 2020
Book Two, Rule Two of the Sword Alone: The Plates
It's been long enough, so here we go! Let's look at the plates for rule two of the sword alone. I think that in general they're a lot more straightforward than those for rule one, which I also think is true of this rule overall. In rule one we had a flowchart which was somewhat complicated, at least until we got it all down on paper. Rule two really just concerns itself as to whether your opponent is on your inside or outside and what you should do in either case. Measure isn't explicitly mentioned, and even implicitly isn't as detailed as how it was covered in the first rule. It isn't as though measure doesn't matter, but it's not the primary principle being used here.
Almost as if each of these rules, while potentially standalone, are also examples of different areas of focus for the principles which will allow you to proceed towards your opponent with resolution. Super weird, right?
So let's get to it!
 Like we saw previously, this plate is an example of our initial guard position. It removes the lower torso from measure and presents the head, as it keeps both the guard and forte of the sword as well as the empty hand by the face to protect it. As we can see, easily finding the sword is made difficult by keeping it initially quite high, and the squared-off body ensures that you can really only be attacked to the inside. All of this means that you can set up a fairly predictable set of actions from your opponent, which will in turn ensure a predictable decision tree for yourself.
 Plate 118 illustrates the next step in this process. As Fabris has previously described, we've lowered our body while keeping the same position of our arm relative to our torso, which brings our sword down to meet our opponent's. This plate also shows one extremely key component of this position - the relative distances of each fencer's body to their swords, and how that impacts the dynamics of the fight. This is kind of a big deal, so let's take a short trip down this rabbit hole before we get back on track with what Fabris explicitly tells us here. (Which also touches on this as well, so it all works out!)
The relative positions of the blades themselves are pretty standard when you think about it. This is where Fabris wants us to get as a general rule - our hilt down by their debole, which is a great position to be. In the plate though, you can see that our head is about as close to our opponent as our hilt, which is in stark contrast to the relative positions of our opponent's hilt and head, where there's a full arm length of space between them. What does that do for us?
So first off, for what is probably the majority of fencers out there, measure is taken from the opponent's sword. There can be a whole lot of problems with that, but I don't think that I'm particularly off base here. What this means is that yeah, your body is probably a lot closer than a lot of people will expect; certainly, it's a lot closer than the relative blade positions will indicate. The upshot of this is that getting your body past the point of your opponent's sword will be a lot easier, especially with the fact that you're constantly moving forward. By the time they cavazione, your torso will have moved past their point, which dramatically reduces the danger that you're in.
In addition to that, remember that your blade is farther out to the side than usual. What this means is that if you've managed to approach to the outside as Fabris tells you to, you're going to force your opponent to take a larger cavazione to get to your inside line and threaten you, and an even larger one than that if they're going to find your blade as part of that motion. Essentially, you're forcing them into a larger and less efficient action if they want to move inside your blade, and you're for sure going to take advantage of that.
Anyway, back to what Fabris says! He notes that with this arm position, if your opponent performs a cavazione that "your body will be as far forward as your opponent's mid-blade." So that all tracks, and a subsequent plate will show us what happens there. Additionally, he notes that if your opponent tries to find your sword, you'll be situated to pass underneath their blade - which we're about to see!
 Here we are at Plate 119, and here we are passing underneath our opponent's sword!
Fabris points out that if our opponent is in a higher guard when we move from the situation in the previous plate, this is more or less where we can end up. Note that we can make out our sword being on top of and controlling that of our opponent's. If they're in a lower guard, Fabris tells us to just lower ourselves to match, which we'll see by the end of this series of plates. Finally, he points out that if our opponent tries to parry and raise their sword, we can turn our hand into second and cavazione underneath their sword and wound them from there, an action which we've seen before.
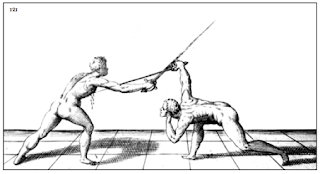
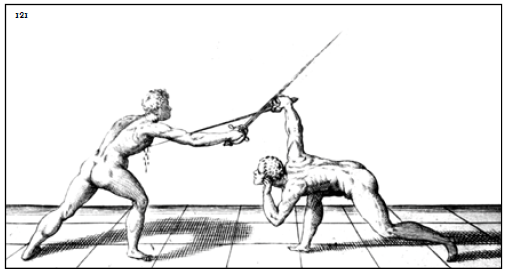
 What if they cavazione to the inside? Here we go! You "lean against the opponent's debole with a fourth." I really like the use of the word "lean" in this description. Look at how our fencer has dropped their hip and turned their body into their opponent's blade to bring it into a fourth. Fabris points out that the right foot is "somewhat out of line" which just adds to the full-body pressure on the sword. He also makes sure to point out that we should "continue all the way to the opponent's body so as to complete the pass" because of course he does. He also notes that if our opponent attempts a girata to save themselves then their defense will actually be weaker for it and they will be able to be wounded in the flank or even the back.
 Next up, we show what happens if as we approach to the outside, our opponent's initial action is to raise their hand to parry. Here, we should turn our hand into second before their blade touches ours and lower our body to wound them over their blade and arm as our head and body pass underneath their blade.
As a note, take a look at the orientation of the feet. The hip and body position that this allows is really helpful for getting your body to twist into that position more easily and, let's face it, when it comes to these postures I think we'll all take every bit of help that we can get.
 Finally, we're going to look at the last two plates together, because they're essentially a before and after set of shots. Like we've been told before, if our opponent takes on a significantly low guard, we should lower ourselves to match them, and that's exactly what we're seeing here.
We're pulling our right side back - check out that foot and hip orientation again! - and with good weight distribution so we can move forward smoothly.

From there, we end up in the final plate in this rule. Once we get to our opponent's blade, we run up it, here in fourth. If they cavazione, we can pick them up in third on the outside easily. If they raise their blade high, we stay in fourth but end up looking more like Plate 120 as we rise up but remain in fourth.
There we have it! Rule two for the sword alone. Body position, body mechanics, and moving around the point of our opponent's sword are on display here, and they are all really clutch concepts to stay safe as we stroll unceasingly towards our opponent.
Almost as if each of these rules, while potentially standalone, are also examples of different areas of focus for the principles which will allow you to proceed towards your opponent with resolution. Super weird, right?
So let's get to it!


The relative positions of the blades themselves are pretty standard when you think about it. This is where Fabris wants us to get as a general rule - our hilt down by their debole, which is a great position to be. In the plate though, you can see that our head is about as close to our opponent as our hilt, which is in stark contrast to the relative positions of our opponent's hilt and head, where there's a full arm length of space between them. What does that do for us?
So first off, for what is probably the majority of fencers out there, measure is taken from the opponent's sword. There can be a whole lot of problems with that, but I don't think that I'm particularly off base here. What this means is that yeah, your body is probably a lot closer than a lot of people will expect; certainly, it's a lot closer than the relative blade positions will indicate. The upshot of this is that getting your body past the point of your opponent's sword will be a lot easier, especially with the fact that you're constantly moving forward. By the time they cavazione, your torso will have moved past their point, which dramatically reduces the danger that you're in.
In addition to that, remember that your blade is farther out to the side than usual. What this means is that if you've managed to approach to the outside as Fabris tells you to, you're going to force your opponent to take a larger cavazione to get to your inside line and threaten you, and an even larger one than that if they're going to find your blade as part of that motion. Essentially, you're forcing them into a larger and less efficient action if they want to move inside your blade, and you're for sure going to take advantage of that.
Anyway, back to what Fabris says! He notes that with this arm position, if your opponent performs a cavazione that "your body will be as far forward as your opponent's mid-blade." So that all tracks, and a subsequent plate will show us what happens there. Additionally, he notes that if your opponent tries to find your sword, you'll be situated to pass underneath their blade - which we're about to see!

Fabris points out that if our opponent is in a higher guard when we move from the situation in the previous plate, this is more or less where we can end up. Note that we can make out our sword being on top of and controlling that of our opponent's. If they're in a lower guard, Fabris tells us to just lower ourselves to match, which we'll see by the end of this series of plates. Finally, he points out that if our opponent tries to parry and raise their sword, we can turn our hand into second and cavazione underneath their sword and wound them from there, an action which we've seen before.

As a note, take a look at the orientation of the feet. The hip and body position that this allows is really helpful for getting your body to twist into that position more easily and, let's face it, when it comes to these postures I think we'll all take every bit of help that we can get.

We're pulling our right side back - check out that foot and hip orientation again! - and with good weight distribution so we can move forward smoothly.

From there, we end up in the final plate in this rule. Once we get to our opponent's blade, we run up it, here in fourth. If they cavazione, we can pick them up in third on the outside easily. If they raise their blade high, we stay in fourth but end up looking more like Plate 120 as we rise up but remain in fourth.
There we have it! Rule two for the sword alone. Body position, body mechanics, and moving around the point of our opponent's sword are on display here, and they are all really clutch concepts to stay safe as we stroll unceasingly towards our opponent.
Subscribe to:
Posts (Atom)