Almost as if each of these rules, while potentially standalone, are also examples of different areas of focus for the principles which will allow you to proceed towards your opponent with resolution. Super weird, right?
So let's get to it!


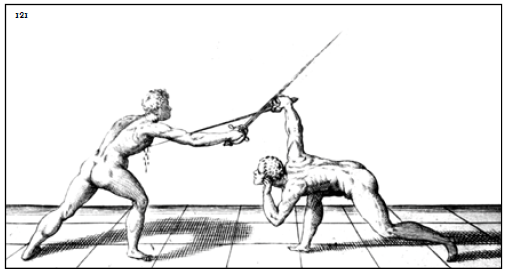
The relative positions of the blades themselves are pretty standard when you think about it. This is where Fabris wants us to get as a general rule - our hilt down by their debole, which is a great position to be. In the plate though, you can see that our head is about as close to our opponent as our hilt, which is in stark contrast to the relative positions of our opponent's hilt and head, where there's a full arm length of space between them. What does that do for us?
So first off, for what is probably the majority of fencers out there, measure is taken from the opponent's sword. There can be a whole lot of problems with that, but I don't think that I'm particularly off base here. What this means is that yeah, your body is probably a lot closer than a lot of people will expect; certainly, it's a lot closer than the relative blade positions will indicate. The upshot of this is that getting your body past the point of your opponent's sword will be a lot easier, especially with the fact that you're constantly moving forward. By the time they cavazione, your torso will have moved past their point, which dramatically reduces the danger that you're in.
In addition to that, remember that your blade is farther out to the side than usual. What this means is that if you've managed to approach to the outside as Fabris tells you to, you're going to force your opponent to take a larger cavazione to get to your inside line and threaten you, and an even larger one than that if they're going to find your blade as part of that motion. Essentially, you're forcing them into a larger and less efficient action if they want to move inside your blade, and you're for sure going to take advantage of that.
Anyway, back to what Fabris says! He notes that with this arm position, if your opponent performs a cavazione that "your body will be as far forward as your opponent's mid-blade." So that all tracks, and a subsequent plate will show us what happens there. Additionally, he notes that if your opponent tries to find your sword, you'll be situated to pass underneath their blade - which we're about to see!

Fabris points out that if our opponent is in a higher guard when we move from the situation in the previous plate, this is more or less where we can end up. Note that we can make out our sword being on top of and controlling that of our opponent's. If they're in a lower guard, Fabris tells us to just lower ourselves to match, which we'll see by the end of this series of plates. Finally, he points out that if our opponent tries to parry and raise their sword, we can turn our hand into second and cavazione underneath their sword and wound them from there, an action which we've seen before.

As a note, take a look at the orientation of the feet. The hip and body position that this allows is really helpful for getting your body to twist into that position more easily and, let's face it, when it comes to these postures I think we'll all take every bit of help that we can get.

We're pulling our right side back - check out that foot and hip orientation again! - and with good weight distribution so we can move forward smoothly.

From there, we end up in the final plate in this rule. Once we get to our opponent's blade, we run up it, here in fourth. If they cavazione, we can pick them up in third on the outside easily. If they raise their blade high, we stay in fourth but end up looking more like Plate 120 as we rise up but remain in fourth.
There we have it! Rule two for the sword alone. Body position, body mechanics, and moving around the point of our opponent's sword are on display here, and they are all really clutch concepts to stay safe as we stroll unceasingly towards our opponent.
No comments:
Post a Comment