Sunday, December 20, 2020

Book Two, Rule Five, the Plates

Okay, we've looked at the initial text for Rule Five, so let's get into the plates. There are nine of them, and of that number there are three pairs of beginning and ending plates. The remaining three are a beginning with two potential endings. Now that we know what to expect, let's get to it!

Here we begin with our fencer standing on the right. We're in fourth on the outside, and our point is aimed at the hilt of our opponent. Since our sword is slightly below our opponent's, if they try to pick us up in second, it will only take a small cavazione to remain free. As a bonus, it will be pretty simple to perform the cavazione such that we end up with our sword crossing over the top of our opponent's, leaving us in a very strong position. Fabris' words are that "the opponent may believe he can find the debole, but he will find the forte instead," due to the fact that as we perform our cavazione we are constantly advancing, bringing our forte into play earlier than expected. If our opponent does not move, we can simply continue to our ideal measure and wound them as-is.

If our opponent takes the opening they see above our sword, we see the outcome of this in the next plate here. (Yes, the perspective has flipped and our fencer is now on the left.) You can see the slightly dropped hilt of the opponent, as they are trying to keep their own line covered as they attack. We perform a tight cavazione and wound them in fourth, as our forte will be pushing against their blade in the tempo of their attack. Note the passing step being used here; all of the forward movement in Book Two are "natural steps," or one foot in front of the other, until there's a possible lunge to drive the point home. Should our opponent be pressing an attack without moving forward, all we need to do is lift our point above their blade and continue forward. Our forte will make contact with their sword, and we continue in to wound them. If they try to retreat so as to gain time and space to parry, we can go back to an old favorite to avoid the parry and wound them in second underneath their blade.

The next sequence has us standing in fourth on the inside of our opponent's blade. Note how squared off we are - Fabris says that our chest is "wholly exposed" which sure isn't an understatement. He does clarify that the purpose of that is to invite our opponent to attack on that inside line or at least move to find our blade as a precursor to an attack at this giant opening. If on the other hand our opponent doesn't move, Fabris notes that we should just move in with our forte on their debole and strike them. Okay, straightforward enough.

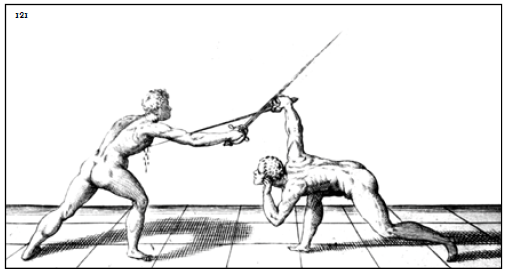
The followup plate has a few interesting layers to it. The accompanying text is really straightforward. As we approach in fourth on the inside, our opponent turns their blade into fourth to cover himself, find our sword, and strike us. The solution that Fabris gives us is to perform a small cavazione after running our sword along theirs, and using the angle that being in fourth gives us to allow us to strike them in turn.

What I find interesting here is that while Fabris notes that this works because we are "in motion," our cavazione happens because our sword is "stationary." The distinction between us as the fencer moving relative to our opponent while our sword as our sword is stationary relative to ourselves is, well, neat. Certainly it makes sense when it's all laid out like that, but I think that most of the time, we don't separate the weapon from ourselves in terms of what's moving and what's still. Doing that lets us describe how we are constantly closing measure but noting that we're keeping the weapon relatively stationary can open up a number of options that we can look at.

In addition, Fabris doesn't call it out, but I think that there's some off-line movement happening with the passing step in plate 145. We're pushing our opponent's blade out somewhat, but I think clearing a little bit farther off in that direction would probably help with getting past the point of their sword. Now that I'm writing those words out here though, I'm second-guessing that. Maybe we can just pick up our opponent as they're rolling into fourth and the point of their sword is still outside of our presence, before they angulate it back into our chest? I think that's possible. Both reads strike me as plausible anyway, and I think working it through slowly would help me settle on one side or the other.

Moving on to the next set! As expected, we begin in fourth. Our opponent is in second and we're in the outside, pointing at his hilt. (We're on the right side in all three plates in this sequence, for a change.) As in the previous exchange, we're leaving out chest fairly wide open as an invitation. Of note is the fact that our chest isn't squared off towards our opponent as part of this invitation, unlike the previous play where we were showing a mostly flat chest as part of the invitation. Playing around with the stances on my own, it seems that this is mostly because of how the orientation of the shoulders impacts the arm and wrist in terms of where we can point our sword. If we want to point our blade towards the inside, then squaring off is fine; it doesn't inhibit our arm angling itself in that direction. On the other hand, if we're in fourth but trying to point to the outside, squaring off means that we're really going to notice our shoulder being impinged and relatively immobile. Additionally, to get the angle for the sword to point outside, we'd need to angulate our wrist to a point that's pretty uncomfortable and also remove any good arm structure we'd otherwise have. It's like our shoulder position makes a big difference with Fabris! (This is not a surprise.)

The first outcome from this beginning is what happens if our opponent does nothing at all when we enter measure; in this case, we bring our point over our opponent's hilt while staying in fourth. Fabris reminds us of this guard's "natural strength" to the outside which will keep us safe. (Remember, the blade is stronger in the direction toward which it points, and our fourth will naturally want to point to the outside.) We'll continue in with a passing step to keep a steady forward movement, but we can extend it a bit because it's the final movement we need. We need to make sure that our right shoulder and hip are turned forward as we extend into the strike, otherwise the broken body structure could let our opponent push through and probably lead to a double-hit. As a final note, Fabris points out that if our opponent performs a cavazione to the inside to wound us from seconda the same thing happens in that our fourth can protect us just as well, which we're about to see!

So even though Fabris previously said it would all work out the same, he's going into a little more detail with the "but what if they cavazione and try to hit me with an angled second" scenario. 

Here our fencer continues forward as normal, and our sword point has already moved from our opponent's hilt to their body. Just like the illustration would indicate, our arm doesn't extend so much as reach across our body, and we can see how our torso is helping get that breadth as well. The other important point which we can see in the illustration (and is made clear in the text) is that we're catching our opponent mid-cavazione, not after they complete it. This is made possible by the facts that we are closing constantly (forcing their cavazione to grow in size) and that our guard isn't changing, so there's less movement and time needed to just pick up their blade with our forte and hilt.

Fabris points out that we can get this same end result if we're approaching to the outside and our opponent tries to wound us over our sword. We can cavazione to the inside and cause them to try and point their sword down to parry us, and we end up pushing through it. That could work, but I think that one of the previous sequences could work just as well. I'd want to play around with it though.

Finally, we have an example of what we should do if our opponent presents us with a very low guard, refusing typical blade engagement. (This has also come up in the first, second, and fourth rule as well, which says to me that this would have been a pretty common concern. Certainly this situation comes up in the SCA regularly, when people just try super hard to avoid any semblance of blade contact.)

Fabris has us point at our opponent's hilt as we have been doing, with our sword in third and directly over theirs. This means that they will need to do something other than just bringing their blade straight up and into us, and the movement to one side or the other will give us the tempo we need to do something about it. If they don't do anything, we just move straight in, stay in third, keep our hilt close to their sword and pass our blade through them. (Specifically through their throat near their right shoulder.) Straightforward enough, as we can see in the final plate.

The aforementioned final plate has some serious similarity to "their sword is held low" plates from
earlier rules. (Seen in rule one, rule two, and rule four.) It's nice to see consistency inside a martial system, but also, I think it says a lot about best practices for dealing with certain problems. Don't reach with the tip of your sword. Get your hilt to their blade. Keep your sword between your body and their sword. Push them farther out of presence as you close. All of the things we've consistently seen applied whenever possible.

Fabris tells us that we'll end up using second in this situation, if our opponent tries anything. When they raise their tip, we'll either yield around them if they go to the inside or wound them underneath their arm if they go to the outside. These reactions only work if we continue to move forward. If we don't, we'll almost certainly take their sword through the chest, throat, or face. 

That's it! That's all of rule four, so I'm going to take a minute and poke at the one huge textual thing which caused me to blink a lot and be very confused before I just shrugged and rolled with it: the fact that in the introduction to this rule, Fabris said that our sword point should be pointing slightly downward. Which kind of is exactly not what was illustrated here except for maybe when our opponent is in the extremely low guard.

I kind of want to poke at the original Italian text for this but honestly, I don't have any fluency at all. I'd be relying mostly on Google Translate which loses me any possible chance of idiomatic usage or anything else. I could maybe stretch and say that the sword is pointing down from the point so maybe it's just a translation weirdness, but the language around why we point downward doesn't seem to support that. Maybe that we keep the sword pointed down as we begin enter measure but move to pointing at our opponent's hilt as we go? I could honestly see that (as I'm staring off into space trying to visualize it) but I'd want to try seeing how these play out with a partner before I really solidly conclude anything.

That concludes rule five for the single sword! I'd like to try to get another ramble about Fiore vs Marozzo Knife Fun but I might just get taken by the urge to push into rule six and wrap up all the single sword material in book two, so I promise nothing.

Thursday, November 26, 2020

Book Two, Rule Five for the Single Sword

Back to Book Two, because that's what I was in the mood to cover when I sat down to write things! Fabris says that the fifth rule is "more subtle than the others" so this could be a trip. (He also says that if we can safely get to the place where we utilize the rule, we'll be able to strike our opponent without ever being in danger ourselves, but that's not a new claim in Book Two. The description of the rule is only about two pages long (though it has nine plates following) so let's get to it.

So while our opponent is in "whatever guard" they like, we move towards them with the usual small steps. While we're doing that and approaching measure - because we're all starting outside of measure, right? -  we'll slowly move our sword into position such that the moment we hit measure, we're set up the way we want. 

Fabris reiterates that as he says in previous rules, we want to set up to the weaker side of our opponent's blade. Nothing new there! This time though, he wants us to get close enough so that our point is near but not past our opponent's hilt. We should have the point of our sword to one side or the other of our opponent's guard as is appropriate to whichever side is weaker, but our sword point should be pointing slightly downward, which is different. According to Fabris, this is for two reasons. First, this should let us perform a quick cavazione if we need to. Second, our opponent will need to lower their hilt to control the point of our sword, which will more or less be a free tempo for us since we'll be so close to them.

Okay. When we get to actually fence and work with other humans again, I'd like to work on this as a concept just to see how it plays out. I can see what he means, but I really want to feel it in my hand to make sure that I get it. My fencing practice dummy just isn't animated enough as-is to get this to work.

Moving on from there, Fabris says that if our opponent is in third or fourth we should be sure to keep our blade in a straight line from point to wrist (which yes, the sword should by definition be straight from the point to your wrist but the wrist should also be straight, maintaining the line through the forearm) and our arm should be well extended so that we can defend against attacks. (Also, extending your arm into a fourth will make it a lot easier to get your blade pointed slightly downward.) 

If our opponent is in first or second, Fabris says that we should "still direct your point toward his sword hand, but this time underneath his hilt." The way I'm reading this really conflicts with the previous statements about keeping our swords pointed downward, which is something that we're going to revisit in the plates. He reiterates that our hand should not make any angle at all, so keep your wrist straight and firm.

Should our opponent strike directly at us from this position, Fabris says that we can defend and strike in a single tempo, over and to the outside of their sword. Again, this is something I need to play with because as I'm seeing it, you'd be running along your opponent's sword with your debole, but to the outside in fourth, which isn't common at all. Fabris does suggest bringing our feet to the outside to keep us safer, so there's that? But what's getting me in combination with closing the line to the outside in fourth is that we'd need to re-angulate our sword such that our point is above their sword as we go. I just wonder if our sword pointing down is less efficient than horizontal? (Fabris does somewhat address this concern of mine later on.)

If our opponent doesn't do anything, Fabris' advice is both general and extremely in keeping with all his prior techniques. We just redirect our point away from their hand and towards an opening, we cover ourselves with our hilt, move the body to support these things, and strike them. It's pretty broad as advice goes, but honestly by this point in the manual it's reasonable to assume that you've really incorporated all of those as basic concepts.

If our opponent turns their guard to third or fourth, we should just cover to the inside and keep moving forward. If those guards are particularly low, we should have our point above their guard and defend with our hilt. (There are a couple plates illustrating this, the second of which has some real similarities to one from the previous rule.) 

Fabris closes with a collection of general pieces of advice for this rule:

  • Be in fourth. No matter what, be in fourth. Keep pointing towards our opponent's hilt.
  • The closer we can get to them the better.
  • Feints can be a problem. Always parry towards the side where our sword and body are. Don't keep our sword on one side and our body on the other.
  • Parrying should be done in fourth, either to the inside or outside. But if their sword is underneath us and to the outside, turn to third as we move.
This is one of those things that is just... really simple, at least on the surface. "Be in fourth, point at their hand, push through them in fourth when they hit you, it'll work out." There's obviously a lot of mastery that's required to be able to manage this in the correct tempo and measure, let alone smoothly and well. I want to reiterate again just how really hard is can be to just walk unceasingly towards your opponent while you try to shut them out and strike them - and our swords aren't sharp. That said, it's also really intimidating to have your opponent doing this to you so it's probably worth the practice!

Next time, plates! Which will clarify some things, make me question some other things, but generally make this at least appear even more straightforward a rule.

Tuesday, November 17, 2020

Marozzo's First Presa and Fiore

 Knife time! Let's dive in, and take a look at some Marozzo and Fiore!

First, we should consider a couple differences what the manuals are being written for. Marozzo's knife defenses appear to be straight-up civilian self defense. Fiore is generally more battlefield oriented, but the fact that he has dagger defenses which start from a seated position, which I think are much closer to the realm of "you're getting jumped" rather than "you're sitting down on the battlefield."

With the caveat that I'm not a teacher of practical self-defense, I think that this is reflected in the structure and details of the various plays. Marozzo presents a number of very specific sets of actions from a general "overhand" or "underhand" attack with a knife. Each of these plays is self-contained and fairly straightforward. These are things that could be fairly readily drilled and practiced in each discrete play, so they'd be easier to gain a baseline proficiency in - but they aren't designed out of the gate to teach how to flow from one to another, or how to deal with possible responses from your attacker.

Fiore is working from the perspective of a martial system for a trained soldier, and that's reflected in the complexity of the plays; the original attack, the remedy, the counter, the counter-counter, and so on. Heck, you could shift from one flowchart into another and into another in the correct situation. There's a lot more there to work with, but it's also more complicated at the outset.

So that's my initial take. Am I right? Beats me, let's start and maybe by the end of all of this I'll have more of a clue!

Marozzo's First Presa is a really straightforward takedown. Against an overhand attack, we block the descending arm with our left hand. We grab their arm and move it backward while we step in and place our right leg behind their right leg and put our right arm across their neck. (The illustration looks like we're grabbing their neck or shoulder, which I think gives more control than just getting your arm across them, but in a pinch that would work too.) We "twist [our] left hand toward [their] right side" and "turn our arms downwards towards the ground." The goal according to Marozzo is to send them head-first into the ground.

Okay, so. One of the first things we notice is something that we definitely have in common with Fiore, and for that matter with all the knife classes I've ever taken. Specifically, we're moving into our opponent. There's no hanging back or playing distance games or anything like that - someone is pulling a knife and trying to icepick you with it, you block it and get in real close so you can get your hands on them and do bad things.

But are the mechanics of this play seen in Fiore? Yes! Specifically, we're looking at the seventh play of the first remedy master, which is the same kind of left handed block against a descending attack. In the illustration of the first remedy master, we can see the left hand and foot are both aligned forward here, which will let us step through with our right foot as Marozzo describes in his manual.

Moving onward to the seventh play, which Fiore describes as "having no counter," we can see a very similar sort of position that Marozzo has us stand in, before our opponent ends up on the ground, though there are some differences. Marozzo has our hand gripping our opponent, and we can still see a pretty decent amount of space between the two combatants. With Fiore, there looks to be much less space - the battle hug is in full evidence, with our attacker's neck in the crook of our elbow, rather than at the length of our arm. Marozzo's instruction to "turn our arms downward" doesn't quite work because of this, but instead we can see how Fiore wants our body to align itself, especially our hips. Look at the hip alignment in Marozzo's illustration as compared to Fiore's. 

It occurs to me now though, that if you follow Marozzo's instruction to pull your arms downward, twisting your hips can flow naturally from that. I wish he called that out, though. I might be adding my own interpretation to what he wants us to do, but all the instruction I've gotten in movements like this would absolutely call for using my hips and full body to take my partner down like this, not just my arms.

So, okay! It looks like a play that's similar enough that I'd be willing to call it the same thing is showing up in both Fiore and Marozzo, which is a neat place to start. Refreshingly straightforward, too! There are twenty or so more plays in Marozzo that we're going to work through, and by the end we should be able to see if there are any which don't map out to Fiore, which of Fiore's don't appear in Marozzo, and see if we can start to draw any other conclusions as we go!

(Images courtesy Wiktenaur, and if you don't already have this site bookmarked, go check them out!)

Thursday, November 12, 2020

Followup from the last post, then knives.

 So I guess it's every three months for a blog post these days? Oof. It might be better than nothing but I'm gonna try to be better about that.

Anyway! So on the docket list, we have:

  • The remaining Book Two rules for the sword alone.
  • Thoughts on the rules we've already looked at; similarities, differences, etc.
  • Flashcard thoughts
  • Something new! (Spoiler: knives.)

I'm not going to get to all of these today because well, everything, but I'll get to some of it!

The flashcards idea worked out pretty well. It's forcing me to learn individual guard positions on their own, rather than as part of a specific sequence. It also is cracking my brain open and making it have to get better at quickly picking up small bits of choreography, which is certainly going to be useful for exercises like play building. (Also it'll be useful to keep that muscle exercised for picking up more kung fu forms.) 

The thought process of "why would I move from here to here" is also something that's pretty great. I think that so far I've been able to come up with mostly-reasonable answers for every change. Some of them have been stretches, and some of my initial responses have been along the lines of "I can see this, and it mostly makes sense, but this would probably be a better response to what I'm imagining" but it's an interesting exercise to try and figure out situations where it would make the most sense to roll through the positions that the flash cards give me. Overall, excellent idea so far. It has especially been good lately when it's just really hard to try and figure out what I want to practice when I grab my sword. It's important to practice with intent, and not just do something like "pick up sword, do some lunges." (I mean, doing lunges for practice is good! Just do it deliberately and with mindfulness and not just on autopilot.) Even if I just shrug and default to grabbing the flash cards, the format of the practice itself forces me to have to engage my brain if it's going to work at all, which is honestly really great these days.

Despite having Things To Do already, as is my way, I'm going to add to the stack. Gotta have a good variety of things to choose from when I have the time to write in here, yeah? So here we go - knives. I want to go through the knife plays of Fiore and Marozzo and compare them to each other for any similarities and differences. It should be fun on a number of levels!

Looking at Fiore, we can see that he wrote Flower of Battle at the beginning of the 1400s. The type of dagger we see is a rondel, which is essentially an icepick. I've seen some versions of them which have a kind of edge, but they're really made for punching through the small gaps in armor. To that point, the techniques we see in Fiore's manual are intended for use on people whether or not they're wearing armor - though frankly, if it works on someone in armor then as a general rule it'll work just fine on someone out of armor.

Moving to Marozzo, his Opera Nova was written in 1536 or so. The dagger we see illustrated looks to be a more "generic" kind of bladed and double-edged dagger with a crossguard. All the plates illustrate an unarmored civilian use of arms as well. Granted, in Fiore's time we'd see duels with plate and harness and in Marozzo's time that wasn't really the common thing to do (at least according to my understanding) but there could be a little more to it as well. The stepping patterns that Fiore describes are particularly suited to a battlefield with uncertain footing and a need to change facing, and we don't see that same type of thing described in Marozzo. Barring the dagger defenses, which include unarmed defenses against a knife attack, it seems that Marozzo is really looking at civilian dueling and defense. Of course, the fact that he has an extensive treatise on duels and dueling in his book also points towards that.

The manuals differ in a couple more ways, too. Fiore's is a sparser writing style, rather than the extensive and step-by-step descriptions that Marozzo offers. The structures of each them are also really distinct. Fiore has his (as far as I know, unique to him) master -> remedy master -> scholar -> counter 'choose your own adventure' system for laying out the various attacks and defenses. Marozzo has a more common setup with individual plays that he works through. Given these differences, I suspect the easiest way to begin comparing sequences between the two of them is to begin with a play from Marozzo and seeing if Fiore offers a similar opening situation, and seeing if Marozzo's solutions are available in Fiore's selection of possible responses.

I'm really excited about this!

Friday, September 4, 2020

Flashcards and Flow

I know, I said I was going to talk about lessons and consistencies that we've seen so far in Book Two of Fabris. Well, time remains a terrible lie and instead I'm going to chat about some other things I've been kicking around in my head. Specifically, flow drills.

I've loved using flow drills when I'm practicing longsword or sidesword. They're dead simple: just flow your cuts together, moving from guard to guard smoothly. They almost automatically scale themselves, too. You can do them as slowly as you need to, you can pause and think about what to do next, you can do them standing still or while stepping through the actions. Ideally, you want to be able to move relatively quickly and smoothly through a variety of actions without pausing more than is necessary. They're helpful for working on a variety of things, and once you hit a certain level of "doing without thinking" they're just meditative to work through.

I've been trying to work out how to easily apply it to rapier fencing in a deliberate way. I don't want to be going from guard to guard with an attack in between, just because that lacks the feel of a flow to me. I could just go through all of Fabris' sword and dagger guards in sequence - I did that for my entry in the So You Think You Can Sword competition from a couple months back - and that's a fun as hell exercise but it only works that single sequence of transitions. It's as much a memorization exercise as it is a physical one, too.

I could just move through a handful of Fabris' guards - probably the sword and dagger ones - but I want to do something a bit more deliberate to start with. Also, I know that it's really easy to fall into habits or avoid more difficult or less obvious transitions, consciously or not.

I was thinking of what to do here, and I remembered a short sequence that Remy did with Alfieri's dagger guards. Besides being much more bite-size in length, I was struck by how he was able to easily loop them, going 1-2-3-4-5-4-3-2-1. That struck me as being about the right number of guards to use; I could loop them like Remy's sequence, or I could potentially work all the combinations smoothly: 1-2-1-3-1-4-1-5-... and on and on.

Then it hit me. Flash cards. I could shuffle up all the guards and pick out however many I wanted, and be forced to work transitions between random guards in a random initial order.

So I've printed up all of Fabris' sword and dagger guards and have cut them out and I'll post later with thoughts as to how this works out as a training aid!

Tuesday, June 16, 2020

Rule Four Plates Time!

Once again, it's been a while so let's get in on this. 

There are twelve plates for this rule. I'm going to end up grouping some of them together, because they're a pretty clear progression through the whole action. It's a bit different than how I've done this previously, but I think it'll make sense once they're all lined up.

Interestingly, along with the first picture, Fabris brings up one of the problems that we can very easily run into when examining plates in manuals. Specifically, that they are snapshots in time, and not necessarily moments to be held. "In the illustrations, it may seem that our fencer, after performing a transverse step, is waiting for a tempo; but this was done only to show the position of the foot, body, arm and sword. In real life, all of this should be done quickly and without pause." This is an important thing to keep in mind with most plates, but perhaps especially when we're looking at Book Two, where the entire point is that we should be in constant motion.

So as we begin, plate 130 shows us on the right. Our left foot had landed almost in measure, so we've stepped off-line out to the right, and we're leaning over our right foot as we go. Note that at this point, our sword is still supposed to remain just underneath our opponent's sword. Fabris says that this will make it more difficult for our opponent to find and so they'll hesitate. That may be true, but there's another point to it that we'll see in a little bit.

Anyway! We flip to the left side for plates 131 and 132. I find 131 particularly interesting because if you look closely, our left foot is already off the ground and moving. It's slight, but it's there - the shadow underneath the foot gives it away. Here, as our opponent hasn't moved, we're picking up our left foot to pass forward "along the line of [our] opponent's sword" while at the same time closing out the line to the inside by beginning to turn our hand into quarta. At this point, if our opponent continues to do nothing, we move right into plate
132, where we have finished the pass forward and have wounded them. Fabris notes that by now, the only options our opponent has available are to parry and retreat, but that's simply too little, too late.

Before we take a quick look at the other possibilities that Fabris mentions could have branched out from the ones that are illustrated here, I want to point out a couple things from plate 132. Notice just how squared off we are in there - start with the hips and look both up and down. There's some profiling in the shoulders, and the positioning of the left arm supports that, but that really just seems to be the final moment of structuring your shoulders for a good quarta and a little more reach. Looking at the hips and legs, we are overall in a very squared off position. The hips are almost completely square to our opponent, with only just enough right hip leading to maintain body structure on the attack. The feet are not remotely in line with each other, either.

How could that have gone differently, though?

If back during plate 130, our opponent could have followed our body with the point of his sword. If they did, we lean off over the other foot which has the additional impact of allowing our sword to more easily close out our opponent's sword, which should now be pointing in the wrong direction. We rapidly follow that with another step, and that's pretty much that.

Around the point in the process where we see plate 131 our opponent could try to cavazione, in which case we can "bring [our] right foot on the line with the left and wound [our] opponent in third" which works in part due to the additional breadth and the geometry caused by the body lean off to the side.

The next set of three plates shows us what happens if we had initially moved to the other line. In this case, we're leaning off over our left foot because we initially landed on our right. From there, the process proceeds in essentially the same sequence as the previous one, just on the outside rather than the inside. (As a note, "our fencer" in the plates goes from the left, to the right, to the left here. I really wish that he had called that out in a more obvious way.)

As a note, Fabris once again relies on terza to be his outside guard. It's certainly faster than turning into seconda, but if possible we won't be touching our opponent's sword anyway. He notes that if we're not worried about blade pressure that we can just push through regardless. However, if our opponent moves to parry our sword we can - and say it with me - turn our hand into seconda and wound them underneath their blade. If instead they
cavazione, we'll just turn into quarta and continue straight in with our left foot. If they cavazione later in the process, around the plate 135 stage, we'll also turn into quarta but catch them before they even finish the cavazione and wound them anyway.

Fabris wraps up this sequence of plates by noting that once we are in a place where we're capable of wounding our opponent, the only option they have available to them is to try and break measure, whereas the fencer who is moving forward has a number of options available to them. This is a pretty common theme in Book Two - the idea that once you get sufficiently close to your opponent, and have maintained control over the engagement the entire way, there's a point where there's nothing that they can do about it except to try and retreat. If they do try to retreat, you just keep progressing toward them, effectively replaying the last step of the progression again and again. It certainly has a different look and feel to more typical engagements, where the "there's nothing you can do here" portion of the fight happens later in the play and doesn't last for as long.

Next we have plate 136. Here we see what happens if we initially step off the line with our left foot, and our opponent follows our body's lean with the point of their sword. Remember that our blade was in line directly underneath theirs, so to close out their blade to the inside, all we need to do is slightly raise ours. Here it was brought straight up such that the guard rests on our opponent's blade, which has the convenient side effect of completely closing them out with minimal movement on our part, and by placing our guard directly onto their blade, which is really the ideal way to have blade contact if you have to have it. If our opponent draws back and attempts a parry, we will perform the unsurprising action of turning to seconda around their parry. We lean back to the left to ensure that we can cleanly pass the point of their blade, and strike them as we go.

Plate 137 is also a single plate and not a sequence. Here we see what happens when our opponent tries to turn into seconda and strike us underneath our blade.

Here we began by stepping off-line with our left foot, leaning over it, and pushing forward with our right. We've placed our blade next to that of our opponent's which completely shuts them out to the outside. As we do that, our opponent turns into seconda and lowers their body as they attempt to strike us underneath our blade. The reason this doesn't work is because the movement of our blade is both incomplete and minimal - we're not committing to a large movement. Additionally we are already in motion forward, all we need to so is to lower our blade and stay in terza. While we pass with our left foot, our body and arm lower as well. Comparing this plate to previous plates with a wound (132, 135, and 136) we can see that our arm is somewhat withdrawn. This is to keep our guard strongly on our opponent's blade to force it downward, with the pictured result.

Plates 138 and 139 are part of the same sequence, so we're grouping them up. This is an interesting setup that isn't explicitly described earlier, but if you take a lot of implied instructions it lines up pretty well! In plate 138, we're in quarta underneath their blade, and you can see our left shoulder is running ahead of our right; we've already stepped off-line with our left foot and followed that with our right, and have moved our body over to the left. From here, if our opponent follows us, we'll wound them to the inside in
quarta, just like we'd expect. If they don't follow us, Fabris says that we'll wound them to the outside - but over their sword while we're still in quarta, which is what plate 139 illustrates.

As an aside, this serves as a good reminder of what Fabris means by "over" our opponent's sword. Here, as in plate 137, our guard is on top of our opponent's sword and is forcing it down and away. While yes, our blade ends up under our opponent's guard and arm as well, it is our guard which has the control in the situation; contrast that with plates 132 and 134.

Plate 139 is an excellent illustration of the sword being stronger in the direction toward which it points - which in the case of a quarta is towards the outside. Quarta closes the inside line, but the guard is stronger towards the outside. Similarly, seconda closes the outside line, but is stronger towards the inside. Angles, wrists, and physics are pretty great. Usually I'd want to turn into seconda to really close out that line, but we're already too close to have the time for that, and with our guard right on their blade, it's really not all that necessary.

Finally, we're down to plates 140 and 141. Here we have a visual depiction of what Fabris says to do if we're using this rule and our opponent assumes a very low guard. Fabris says that this doesn't require any "sudden movement" downwards of the hand, body, or feet - you're just moving yourself into position as you approach into measure. 

Note how here we can see a depiction of Fabris' warning from the first section of this rule, how as we lower our guard, we need to be sure to leave the
point of our sword above the guard of our opponent's. If we don't, you can now easily see how that would change the relationship between our forte and our opponent's debole, making it much easier for them to cavazione, take control of our blade, and wound us.  

Plate 141 is the result of the setup in 140 if our opponent doesn't do anything; we've turned into quarta. The only options for our opponent that could extend this play involve breaking measure, and raising their sword to parry. If they do this though, they'll likely bring their points off line anyway, and we can just use our body positioning to remain safe and wound them underneath their blade in seconda.

Whew. That was a lot of material to cover. We have two more rules for the sword alone, but for my next post, I think I'm going to take a break and go through the material we've covered so far and look for similarities, differences, common concepts, and how it all works. I think that looking at each rule as an individual flowchart is perfectly valid and honestly good - you can absolutely approach your opponent and decide as you're approaching which rule to apply - but digging a little deeper might show us something useful, or at least be an interesting exercise.


Thursday, June 11, 2020

Book Two, Rule Four for the Single Sword

Yeah, I know, I said I'd have this up a bit ago. These days though, time is a lie! So here we are.

Fabris opens up by saying that this rule is "also founded on an undetermined placement of the sword as you proceed against the opponent." Where rule three focused on proceeding to the outside when you could, this rule focuses more on the inside line, which Fabris points out "requires greater skill." 

To begin, our advance occurs with our chest square on to our opponent's point. This is essentially an invitation, as Fabris says that we really want to convey the impression that we're going to deliberately run onto their sword. This is explicitly to get them to keep their sword directed at our center line.

As we step into measure though, we step off to the side with the foot we enter with. If we're stepping in with the right foot, we step off to the right. If we're stepping in with the left, we step off with the left. When we do this, we'll lean our body off in the same direction, removing it from the line of our opponent's sword "while the opponent's openings will now be open to [us]."

We're keeping our sword near to our opponent's, so we can defend ourselves easily if they attack us as we enter measure. If they don't do anything, we keep going on the side we've already stepped toward to close them out of line completely, and wound them as we take a second step.

If instead our opponent follows our body with the point of their sword while we're taking that first step off line - and this is a pretty neat action - we move forward with the other foot (which Fabris notes "by then should be in the air") and bend our body over it so we move off line to the other side. Then we just go forward and wound them.

Fabris says that these processes are meant for when our opponent keeps their sword point in line with our upper body, more or less. If their point ends up "directed against [our] knee, or even lower" we just move forward straight against it and close out their blade downward with our blade on top, such that they can't lift their sword. When we do this, we need to be very sure that our hilt is what lowers the most, and that our point does not fall underneath their blade at all. If that were to happen, our opponent could wound us with an easy cavazione, since we'd need to perform a contracavazione at close measure. If our point is correctly situated relative to our opponent's blade though, we can wound them while they try to perform that cavazione.

Finally, Fabris notes that if our opponent is to the outside, we shouldn't need to adjust our hand. If they're on the inside though, we'll need to turn our hand slightly into quarta, but be careful not to lower our hilt and create an angle that we could be wounded through.

That's... that's it. It's really short. It's deceitfully straightforward. It also has twelve plates following it up, and I spent a good amount of time flipping back and forth between this section and the plates, trying to make sure that I was visualizing things correctly, which is what most of the next post is going to be. Also, lots and lots of plates.


Monday, May 25, 2020

Intermission: The Warrant for the London Masters of Defense

It's been a while since my last update, and I've still got my notes on the next set of Fabris' rules to go through. As we all know though, things are kind of a mess right now and it can be really hard to accomplish anything.

So just to keep posting anything, here's the text of the Warrant that Henry VIII signed on July 20, 1540 to form the London Masters of Defense, because it's interesting!

Ric. Beste, Humph. Bassett, Rob. Polmorth, John Legge, Peter Beste, Philip Williams, Ric. Lord, John Vincent, Nic. de la Hay, masters of the “Science of Defence,” and Will. Hunt, John Frye, Hen. Whytehed, Gilbert Bekett, Edw. Pynner, Thos. Tourner, Jeffrey Gryffyn, Thos. Hudson, Thos. Tynosey, Hen. Thyklyppes, and John ap Ryce, provosts of the same science. Commission to enquire and search, in all parts of England, Wales, and Ireland, for persons being scholars of the said science of defence (many of whom, regardless of their oaths made to their masters on first entering to learn the said science, upon the cross of a sword in remembrance of the Cross whereon Our Lord suffered, have for their own lucre of their “unsaciable covetous minds,” without sufficient licence, resorted to all parts of England, keeping open schools and taking great sums of money for their labours, and yet have insufficiently instructed their scholars, to the great slander of the masters and provosts of the science and of the good and laudable orders and rules of the same), and to take any scholar so misusing himself before the nearest justice of the peace to be bound in sufficient sureties not to repeat his offences against his said oath and the said orders and rules, or in case of refusal to be committed to gaol. Westm., 20 July 32 Hen. VIII. Del. Westm. 20 July.—S.B. (In English.)


It's really interesting to see that it isn't about going out and teaching, but about going out and dragging off teachers who are misrepresenting themselves or not teaching sufficiently well and punish them for it.

Huh!

Okay, we're going to try to get the first post up for the Fourth Rule for the sword alone by the end of the coming weekend.

(Be safe, everyone. Okay?)

Wednesday, March 18, 2020

Book Two, Rule Three for the Single Rapier, the Plates

Ugh, more than a month for a break? Not cool! Anyway, no changing that so let's just work our way forward by looking at the plates that Fabris included for Rule Three of the sword alone.

Diving right in, we have plate 124! We're the fencer on the right, standing over our left foot, having just stepped into measure and found our opponent's sword on the outside. Up until now, our initial entry has been performed with the right foot leading, and I'm happy to see an example of it happening with the left. (I know at least two southpaws who are reading this right now and giving me dirty looks. What can I say, I'm just being true to the source material here.) This can happen pretty readily when you're approaching with a natural step whichever rule you're applying, so seeing it finally show up in a plate is great. While our fencer is passing their left foot forward, take note of their body mechanics, specifically their feet and hips. Their feet are aligned as you'd expect from a "regular" fencing guard, with their right foot pointed forward and their left foot pointed to the side, even though they're passing the left foot forward. This allows for the hip orientation that you see, which leaves the right side hip oriented towards their opponent. This is really important for us because it preserves our measure as well as the body mechanics we need to meaningfully oppose our opponent's blade, should it come to that. (Try it, though. Pass forward with your left foot but reorient it so that it's pointing more forward. Your hips will very likely relax some, your right hip will drop, and you'll lose range. If you have a partner, have them try to push your extended hand around, and it'll be a lot harder to resist the pressure. Body mechanics are really important, people.)

Ahem, right. Anyway, Fabris tells us that we're to proceed into measure without a guard and find our opponent's sword as we place our foot in the "danger zone." (Yes, I know.) We're to keep our opponent's sword covered without touching it and just proceed to and through our opponent. If they give us a tempo, we take it. Otherwise we just keep proceeding along forward, "with good union of sword, feet and body."

The next plates are laid out in no particular order, and Fabris really just kind of free-forms his way through some what-if problems. Taking a look at the next one, we see "what if when we move to find their blade, our opponent performs a cavazione into a high fourth with a girata?" In this case, Fabris wants us to simply turn our hand into fourth as well, pushing through our opponent's blade and wounding them in the throat. He points out the inherent structural weakness of the girata in terms of being able to oppose our blade - that plus having the advantage of having found them means that we can displace their blade fairly easily. Also, note the position of our arm - we're pushing his blade off to the side fairly strongly, which both ensures our safety as well as moving our blade farther to the inside so as to be able to successfully wound our opponent as they have rotated their body out.


Here we have a similar response, with our opponent turning their hand into fourth and attempting to drop their tip and strike us underneath our guard. The solution that Fabris gives us shouldn't really be a surprise at this point - drop our body and turn our hand into second, wounding our opponent underneath their guard while we shut them out entirely.

The next two plates flow together, one after the other, so let's do that. We approached without forming a guard until we hit measure, and we end up in a fairly high angled third. (Fabris doesn't specify if we're on the inside or outside though; from squinting at the plates, it looks like we're on the inside and frankly, the actions he suggest imply this as well. I know, the rule has us approaching from the outside, but here we are.) From here, we've covered our line, and we're in a pretty safe position. If our opponent doesn't do anything, we can just extend into fourth and proceed through to striking them like we all want to be able to. If they cavazione, contracavazione and strike them in fourth anyway. (I'd suggest extending your arm as you go though, so as to be able to perform a sufficiently small contracavazione.) On the other hand, if they cavazione and you're sufficiently close to them - say it with me now - turn your hand into second, lower your body, and pass underneath their sword to wound them.


Here's the last plate we have for this rule! It's a little complicated and the stance makes it look worse than it is, but honestly? It isn't anything that we haven't seen before, and the stance is just a passing step caught in a snapshot. We're approaching to the outside in third, and this time our opponent tries one of our usual techniques - they turn their hand into second and try to wound us underneath our sword as they push forward with their right leg. To counter this, we lower our point and body both, bringing our sword down on top of theirs as they are moving their blade and coming forward.

If in this case, our opponent tries to push back against our blade by turning back into third, we can simply turn into second to shut him out completely and push forward. If they try to cavazione back to the outside in second, we will - and stop me if you've heard this one - turn our hand into second, lowe our body, and strike underneath our opponent's sword.

Fabris closes by taking the time to point out that these actions will succeed not solely because we're in third and obliging our opponent to move to defend themselves, but also because we have the advantage of already being in motion, which is a clutch point that much of Book Two rests on.

That's the Third Rule! The Fourth Rule is a really long one, so I'll get crunching on that as soon as I can. I may take a break to touch on anything that's come up in the first three, or any other things that occur to me just to clear my head, and then dive into it.

I was also planning on preparing a look at all of this for a Laurel's Challenge event near the end of April, but well... that's not happening now. An online substitution may well end up happening instead, and while I'm not sure what format my material might take then, it'll be interesting to put together.

Saturday, February 8, 2020

Book Two, Single Rapier, Rule Three

Let's make some progress here! With this, we're hitting the halfway point of the rules for the sword alone.

No need for more of an introduction so here we go!

Fabris opens by touching on some advantages and disadvantages of the first two rules. For the first rule, he says that it is good because it lets us gain an advantage from farther away. On the other hand, he says that we might give away our strategy too soon, and that our opponent could manage to change things up enough or otherwise find the time to somehow save themselves. This seems fair, and it does square with the instances in which Fabris tells us that we may need to withdraw and try again, or that our opponent could retreat enough to effectively break engagement.

The second rule he describes as good because it really only allows for a single opening, which is close enough to our sword hand that our opponent can't attack it without essentially attacking through our forte. Because of this, we've reduced our decision tree to "our opponent does a really bad idea for themselves" and that's that. It also keeps our sword free and we don't need to worry about performing lots of cavazione, unlike the first rule. On the other hand, he describes it as "laborious" and keeping the arm almost completely immobile is just plain tiring after not all that much time.

Keeping these issues in mind, Fabris describes the third rule as one that will not give away our strategy until far too late, so that our opponent will not be able to move themselves or parry until it is too late. The method that Fabris tells us will accomplish this is this: since our opponent by definition can't wound us until we're in measure, we will not assume a guard at all until we are stepping into measure. We will be approaching our opponent to the outside without being in guard or having our sword in any particular position. As we are stepping into measure with either foot (Fabris specifies "when you lift your foot to step into measure") we will place our forte against our opponent's debole to shut them out of line without stopping, at which point we - as we might expect - are to run along our opponent's blade with our sword without stopping or flinging out our arm.

There aren't any specific details of stances and movements there, but given that we aren't told to form any specific guard as yet, that makes sense. Still, it does feel like it's more theory and less application as yet, so let's see where we go from here.

Fabris then tells us that if we end up on the inside and our opponent tries to parry we - and this will not remotely surprise people who have been reading along up to this point - "should change from third to second, lower [our] body as [we] proceed forward and wound [our] opponent in the tempo of the parry." Nothing remotely surprising here, and in fact this is pretty much right out of rule one, as well as other plays that Fabris illustrates in the first book of his manual. Fabris points out that our opponent will not be able to bring his point back into line but does state that if we have any hesitation or break in our motion after we find their sword then our opponent will be able to find the time to return their blade to line because of that slowing of our action.

So far, so good. Straightforward and we don't have any real surprises yet.

Fabris says we can apply "the same resolution" in passing if our opponent tries to parry without breaking measure as we find their sword - just turn to second underneath, and pass to wound them before they can apply any pressure to our blade. On the other hand, if they retreat as they parry we should cavazione before they touch our blade. This will essentially place us in a starting position, albeit on a different line, and we can continue as normal.

At this point, Fabris points out that we want to avoid "making any motions contrary to a cavazione." For instance, if we make the first motion toward our opponent's blade, we cannot also cavazione in that tempo. If we suddenly lower our hand, we can't bring it back up. In general, this is good advice to remember, but when we're playing games with collapsing our measure and tempo like this, we can't afford to waste any motion.

He goes on to describe how, if we have good enough control over our blade to be able to change the original motion into another one, we can "perform a splendid deception" on our opponent. (Sounds like feinting but okay Fabris, let's hear it.) "As soon as you place your foot in measure, you gain the opponent’s sword. As he tries to meet your blade and resist to it, you deceive him with a cavazione and proceed forward with the other foot, so that he cannot return in line. All he can do at this point is to try to wound you under your sword with a half-cavazione, but you can avoid this danger by simply lowering your point and your body to the same side of his sword. This keeps him out of line as you push your attack home." Okay that's... pretty straightforward and not out of keeping with anything we have so far, really. It seems a bit more... hm. Proactive is the best word I can come up with off the cuff as I write this, but I'll work on it. It seems a bit more proactive than how Fabris has set up his rules so far, which generally seem to be more in the vein of "I have placed my opponent in a no-win scenario and have a response for whatever they might do" as opposed to "I'm going to feint on the way in" but even still, I can get there.

Fabris then says that if our opponent performs a cavazione as we find their sword, or comes forward, we'll just wound them in that tempo. If they break measure as they cavazione to find our sword, we should just contracavazione and keep right on going forward and wound them. If they change their guard while breaking measure, we keep moving forward but we place our sword against theirs such that we can keep running our sword along theirs. Light on details, but straightforward enough with what we've seen in the previous rules.

Moving on, we are told that we should keep the measure in mind, and that it should make us aware of potential offenses or defenses that we might see, and that we should be prepared for them. Sure, okay, good advice but again, not so much with the details.

Fabris does say that he's not going to discuss what to do if our opponent completely breaks measure or they just lean away, because they're not threats. Likewise if they try to cut, we can wound them as they prepare the cut and that's that. If they're moving away as they do this, he says that we can just parry in fourth or second or void the cut and strike them.

He closes by pointing out that this rule requires a very refined understanding of measure. This certainly seems true, as we need to be able to know when we are about to enter our opponent's measure so that we can be entering a guard as we do so, and to be aware of what our opponent can accomplish at any point in the closing of measure.

All that said, this rule so far really reads to me as what would happen if the first rule had a lot of the flowcharts stripped out of it and more or less simply had "do what you need to do" added in. This would be terrible as a first rule, but in terms of following the first and second, it really seems much more like presenting an alternate way to implement the principles that we saw in there, which is great.

Soon, the plates!

Thursday, February 6, 2020

Book Two, Rule Two of the Sword Alone: The Plates

It's been long enough, so here we go! Let's look at the plates for rule two of the sword alone. I think that in general they're a lot more straightforward than those for rule one, which I also think is true of this rule overall. In rule one we had a flowchart which was somewhat complicated, at least until we got it all down on paper. Rule two really just concerns itself as to whether your opponent is on your inside or outside and what you should do in either case. Measure isn't explicitly mentioned, and even implicitly isn't as detailed as how it was covered in the first rule. It isn't as though measure doesn't matter, but it's not the primary principle being used here.

Almost as if each of these rules, while potentially standalone, are also examples of different areas of focus for the principles which will allow you to proceed towards your opponent with resolution. Super weird, right?

So let's get to it!

Like we saw previously, this plate is an example of our initial guard position. It removes the lower torso from measure and presents the head, as it keeps both the guard and forte of the sword as well as the empty hand by the face to protect it. As we can see, easily finding the sword is made difficult by keeping it initially quite high, and the squared-off body ensures that you can really only be attacked to the inside. All of this means that you can set up a fairly predictable set of actions from your opponent, which will in turn ensure a predictable decision tree for yourself.

Plate 118 illustrates the next step in this process. As Fabris has previously described, we've lowered our body while keeping the same position of our arm relative to our torso, which brings our sword down to meet our opponent's. This plate also shows one extremely key component of this position - the relative distances of each fencer's body to their swords, and how that impacts the dynamics of the fight. This is kind of a big deal, so let's take a short trip down this rabbit hole before we get back on track with what Fabris explicitly tells us here. (Which also touches on this as well, so it all works out!)

The relative positions of the blades themselves are pretty standard when you think about it. This is where Fabris wants us to get as a general rule - our hilt down by their debole, which is a great position to be. In the plate though, you can see that our head is about as close to our opponent as our hilt, which is in stark contrast to the relative positions of our opponent's hilt and head, where there's a full arm length of space between them. What does that do for us?

So first off, for what is probably the majority of fencers out there, measure is taken from the opponent's sword. There can be a whole lot of problems with that, but I don't think that I'm particularly off base here. What this means is that yeah, your body is probably a lot closer than a lot of people will expect; certainly, it's a lot closer than the relative blade positions will indicate. The upshot of this is that getting your body past the point of your opponent's sword will be a lot easier, especially with the fact that you're constantly moving forward. By the time they cavazione, your torso will have moved past their point, which dramatically reduces the danger that you're in.

In addition to that, remember that your blade is farther out to the side than usual. What this means is that if you've managed to approach to the outside as Fabris tells you to, you're going to force your opponent to take a larger cavazione to get to your inside line and threaten you, and an even larger one than that if they're going to find your blade as part of that motion. Essentially, you're forcing them into a larger and less efficient action if they want to move inside your blade, and you're for sure going to take advantage of that.

Anyway, back to what Fabris says! He notes that with this arm position, if your opponent performs a cavazione that "your body will be as far forward as your opponent's mid-blade." So that all tracks, and a subsequent plate will show us what happens there. Additionally, he notes that if your opponent tries to find your sword, you'll be situated to pass underneath their blade - which we're about to see!

Here we are at Plate 119, and here we are passing underneath our opponent's sword!

Fabris points out that if our opponent is in a higher guard when we move from the situation in the previous plate, this is more or less where we can end up. Note that we can make out our sword being on top of and controlling that of our opponent's. If they're in a lower guard, Fabris tells us to just lower ourselves to match, which we'll see by the end of this series of plates. Finally, he points out that if our opponent tries to parry and raise their sword, we can turn our hand into second and cavazione underneath their sword and wound them from there, an action which we've seen before.

What if they cavazione to the inside? Here we go! You "lean against the opponent's debole with a fourth." I really like the use of the word "lean" in this description. Look at how our fencer has dropped their hip and turned their body into their opponent's blade to bring it into a fourth. Fabris points out that the right foot is "somewhat out of line" which just adds to the full-body pressure on the sword. He also makes sure to point out that we should "continue all the way to the opponent's body so as to complete the pass" because of course he does. He also notes that if our opponent attempts a girata to save themselves then their defense will actually be weaker for it and they will be able to be wounded in the flank or even the back.

Next up, we show what happens if as we approach to the outside, our opponent's initial action is to raise their hand to parry. Here, we should turn our hand into second before their blade touches ours and lower our body to wound them over their blade and arm as our head and body pass underneath their blade.

As a note, take a look at the orientation of the feet. The hip and body position that this allows is really helpful for getting your body to twist into that position more easily and, let's face it, when it comes to these postures I think we'll all take every bit of help that we can get.

Finally, we're going to look at the last two plates together, because they're essentially a before and after set of shots. Like we've been told before, if our opponent takes on a significantly low guard, we should lower ourselves to match them, and that's exactly what we're seeing here.

We're pulling our right side back - check out that foot and hip orientation again! - and with good weight distribution so we can move forward smoothly.

From there, we end up in the final plate in this rule. Once we get to our opponent's blade, we run up it, here in fourth. If they cavazione, we can pick them up in third on the outside easily. If they raise their blade high, we stay in fourth but end up looking more like Plate 120 as we rise up but remain in fourth.

There we have it! Rule two for the sword alone. Body position, body mechanics, and moving around the point of our opponent's sword are on display here, and they are all really clutch concepts to stay safe as we stroll unceasingly towards our opponent.

Wednesday, January 22, 2020

Book Two, Single Rapier, Rule Two!

We've made it through the holidays, the holiday funk, the post-holiday illnesses, and the post-holiday funk and here we are, back at it and looking at the second rule of Book Two!

This one is where we start to get a little weird. Fabris describes it by saying that "[t]he principal guard pertaining to this rule is a third formed with the body positioned squarely toward the opponent, the chest wide open and the feet pointing forward. The body is curved and the sword-hand is held near the face. The sword-point is suspended in the air and kept somewhat forward, but not so far forward as to enable the opponent to find it without coming into the misura stretta." The description is pretty straightforward, but just because the first time I read it my reaction was something like, "Okay, I can picture this pretty well but that can't be right..." here's the plate from later on in this rule which illustrates it:
Nope. I wasn't kidding. It's a little weird, right?
Yup. Just like that - squared off, your hilt and forte up by your face, and your off-hand up by the other side of your face.

We still have the signature hip hinge, with the lower body voided back. We might square off a little if we're using a dagger or cloak, but not at all to this extent. So what is Fabris thinking with this? What's his plan?


The clutch piece of information for using this initial guard for proceeding with resolution is that you initially want to do your best to move towards your opponent on the outside. Circle a bit if you need but try very hard to be on that outside line to the point that "even your sword is out of presence to that side." As you approach your opponent lower your body while keeping your arm in the same position relative to your body, such that when your hilt is by their point, your blade should be in line with them. Do not extend your arm to strike, but keep it in that position and wound them by stepping forward and passing your blade through them that way. (We'll go into why this is a thing later on in another post.)

What if you can't move to the outside because your opponent just won't give you that line? In that case, place your sword to the inside but don't extend the arm in there, either. You'll stay more squared up than not, kind of, but turn your body from the hips to get your blade to cover the inside line. Lower your body, but again, keep your arm in the same position relative to your torso.

Finally, if your opponent keeps their sword really low, just (ha ha, "just") drop your body low enough such that your sword can close theirs out on either line. Fabris does note that if they're positioned to the inside of your blade, you should turn your right side away in a void as you lower yourself.

Fabris goes on to note that you should not use cavazione in this guard save for if your opponent tries to bring his point high to find your blade. In this case, you perform a cavazione of sorts, but not through a motion of the hand or arm - rather, you withdraw your right side similar to what he described in the previous action, which pulls your sword back and keeps it free. As you do this, advance and step off-line with your left foot, which will turn you such that your opponent is now on your outside, and you can proceed in to wound them.

If your opponent tries to parry you, turn your hand to wound them underneath their sword, similar to the previous rule.

Fabris finally notes that while your face and inside are somewhat open, your left hand will protect your face, and if your opponent feints to the inside, you again cover yourself by turning the body rather than moving your arm.

We'll take a look at the additional plates in the next post, which will help illustrate why keeping your arm in the same position is helpful in this rule. They'll also help show us what is to be gained by turning our bodies to cover ourselves, rather than moving the arm. Spoiler: they help us move our torso (which is filled with squishy organs which should not be pierced) around our opponent's point.